I hated the rear fender set up on my Thruxton, so one of the first things I wanted to do was install a Thruxton fender eliminator kit. Sure the rear fender on the stock Thruxton gives it that classic look, but I was really looking for something a bit more sportier.
The Thruxton fender eliminator kit that I went with was the Maund FEK, and thought I’d share my experience with the Maund installation process, as well as my observations of the product.
I had every intention of taking some detailed pictures during the Maund FEK installation, but I was so damn excited to get the thing installed, it slipped my mind. There was only one tricky part that I’ll call out below, so the lack of pictures shouldn’t discourage anyone from giving this a go.
Maund FEK Product
First things first, the Maund FEK product was easy to order. Simply go to his personal site at MaundSpeed, and you can order securely directly from this site. You can also find him on eBay by doing a search for seller Canyon_Racer. You can order a number of different configurations of the Fender Eliminator Kit (FEK), the one I selected had the integrated rear turn signals as well as the bullet front turn signals. If you don’t want the turn signals, you can order just the FEK package. The Maund FEK as received contained the following parts:
- Bracket (extremely sturdy)
- Lucas Style Rear Lamp
- Stainless Mud Pan
- Front/Rear Turn Signals
- All mounting hardware
I also ordered the quick connect harness, as I didn’t want to deal with splicing and soldering electrical connections. Definitely worth the extra $40 if you can afford it. It’s a simple plug and play connection, and it ended up saving me lots of time.
Maund FEK Installation
The install was pretty straight forward, as I had done quite a bit of research on this prior to purchasing. The one item that seems to give everyone a bit of trouble, is the wire connections to the tail light and rear turn signals. I didn’t have an issue here, as I was able to find the connection guide prior to my install (identified below).
If I had one complaint with the product, it would be that there were no instructions included with the kit. As I said before, it’s pretty straight forward, but some simple instructions would have saved me time with some rework that wasn’t necessary. If you ordered the integrated rear turn signals, first thing you’ll want to do is install the rear taillight on the bracket using the included hardware. If you install the turn signals on the rear bracket before the taillight, you won’t be able to access the nut to secure the taillight.
Ask me how I know… Also be aware that when you it comes time to do the wiring connections, you’ll need to ground the connection to one of the studs on the lamp housing.
Fender Removal
Once you have the rear taillight and turn signals attached to the bracket, it’s time to put it on the bike. Remove the seat from your Bonneville or Thruxton, and start the process to remove the rear fender. There are four nuts that need to be loosened to remove the rear fender, it will be easy to figure out.
Before completely removing the fender, be sure to unhook the connection for the existing taillight and turn signals (it’s a quick connect). After all that, the rear fending assembly will simply pull away.
Attach the Mud Pan
Next we need to install the mud pan. This will keep out mud, water, debris from the electronics that are found under the seat. Kind of important since we won’t be having a rear fender any longer.
The stainless mud pan simply bolts into the existing holes that were used to attach the fender. Again, pretty simple to figure out. Do not, I repeat, do not attach the bolts to the rear of the mud pan just yet. You’ll want to keep the back of the mud pan free as that will need to fit into the bottom part of the bracket that we’ll install in the next step.
Attach the Bracket
Now we’ll attach the bracket that contains the rear taillight and turn signals. This was the trickiest part for me, as initially I installed it incorrectly. While it seemed to work, I had an issue with getting the seat back on to fit just right.
The bracket will attach between the frame on top and the mud pan at the bottom. The rear of the mud pan will fit into the slot on the top of the bracket. Take a look at the following picture to get a better idea of what I’m talking about.
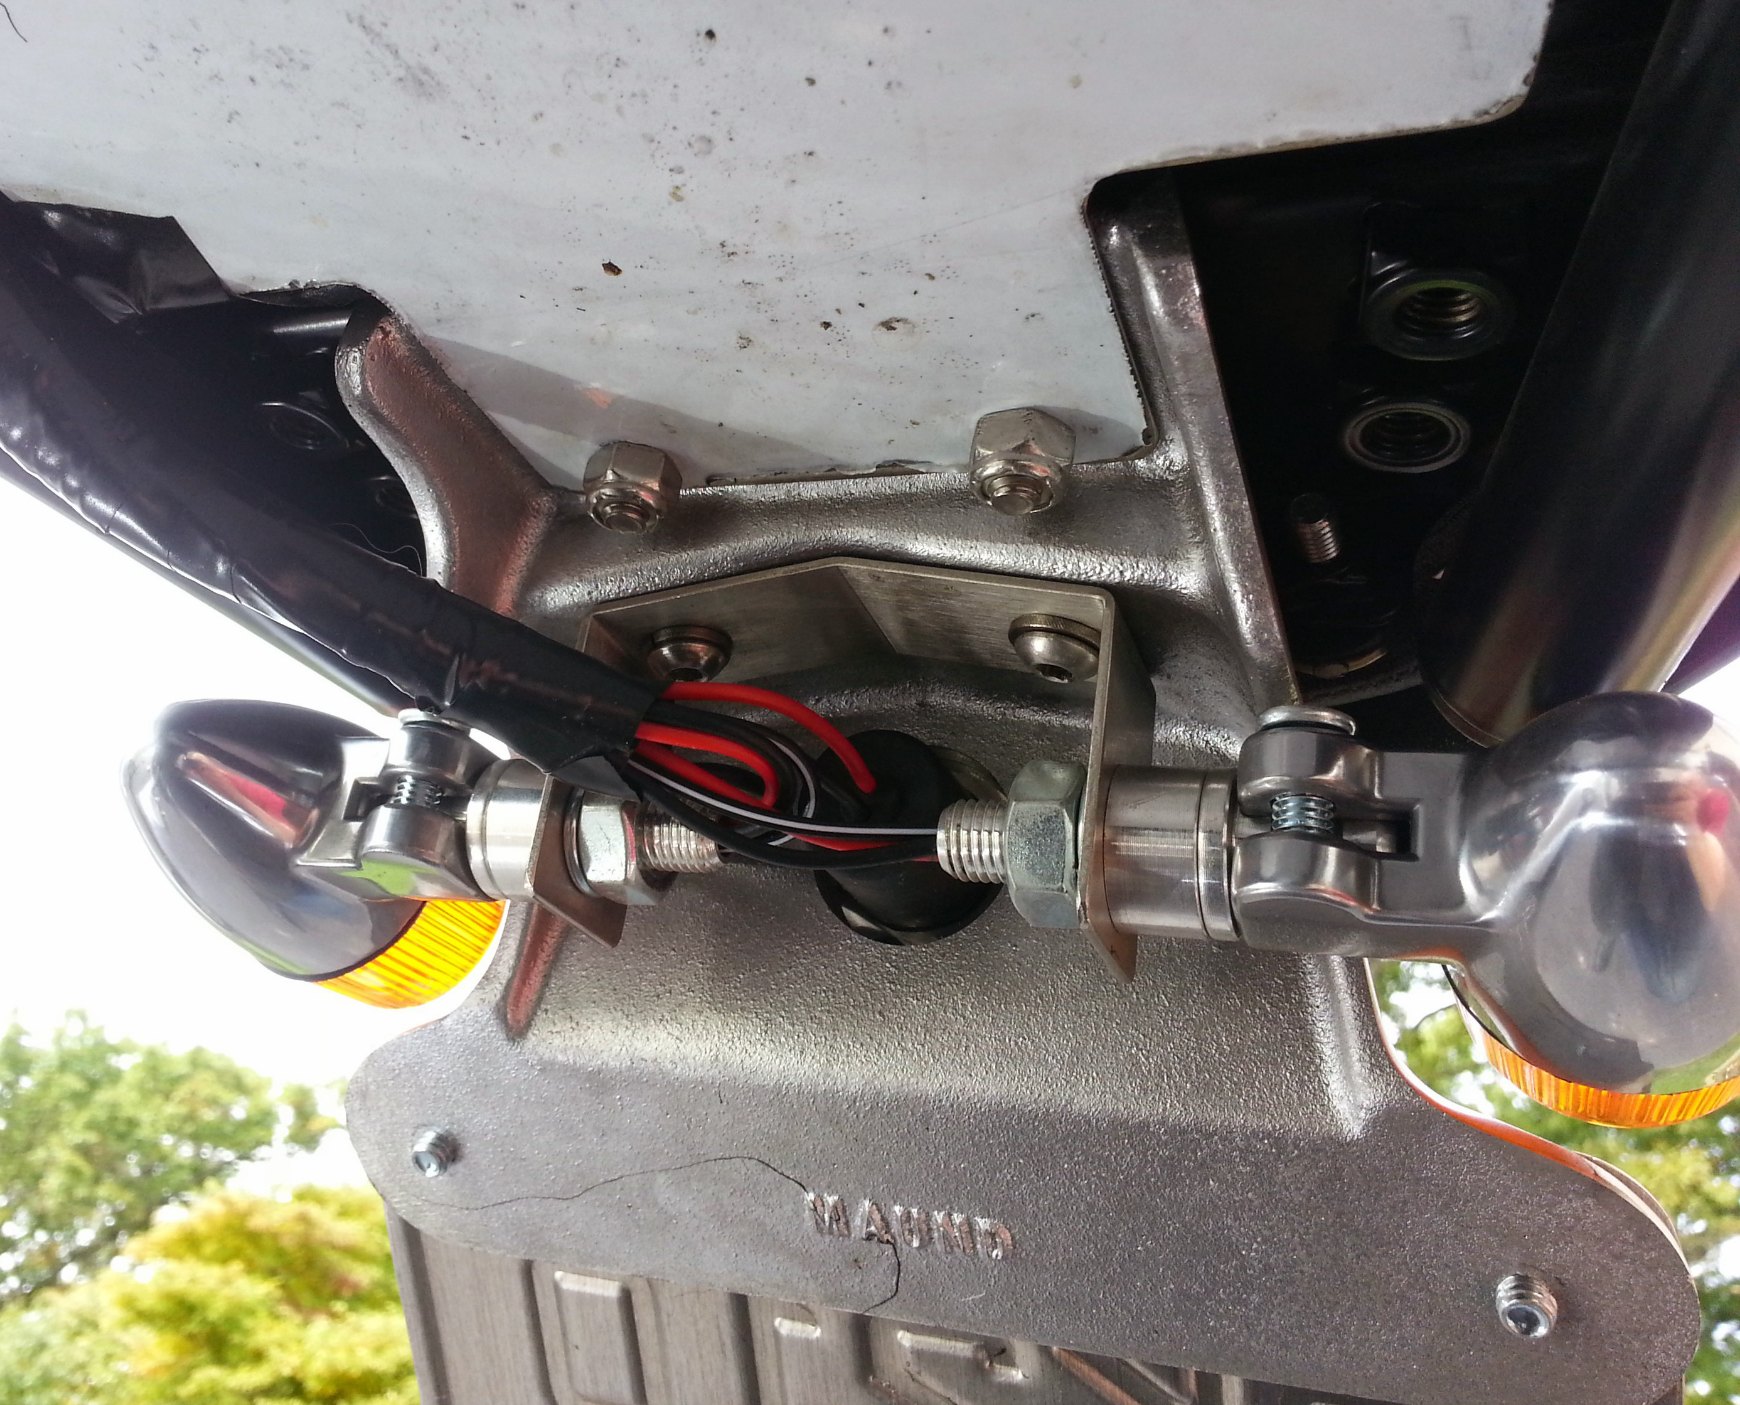
Once you have it fitted right, tighten all bolts with the supplied nuts.
Connect the Wiring Harness
Last step. Time to connect everything up and see if it works. This is where the quick connect harness will save you some time. If you didn’t go that route, you’ll have to start splicing and soldering wire at this point.
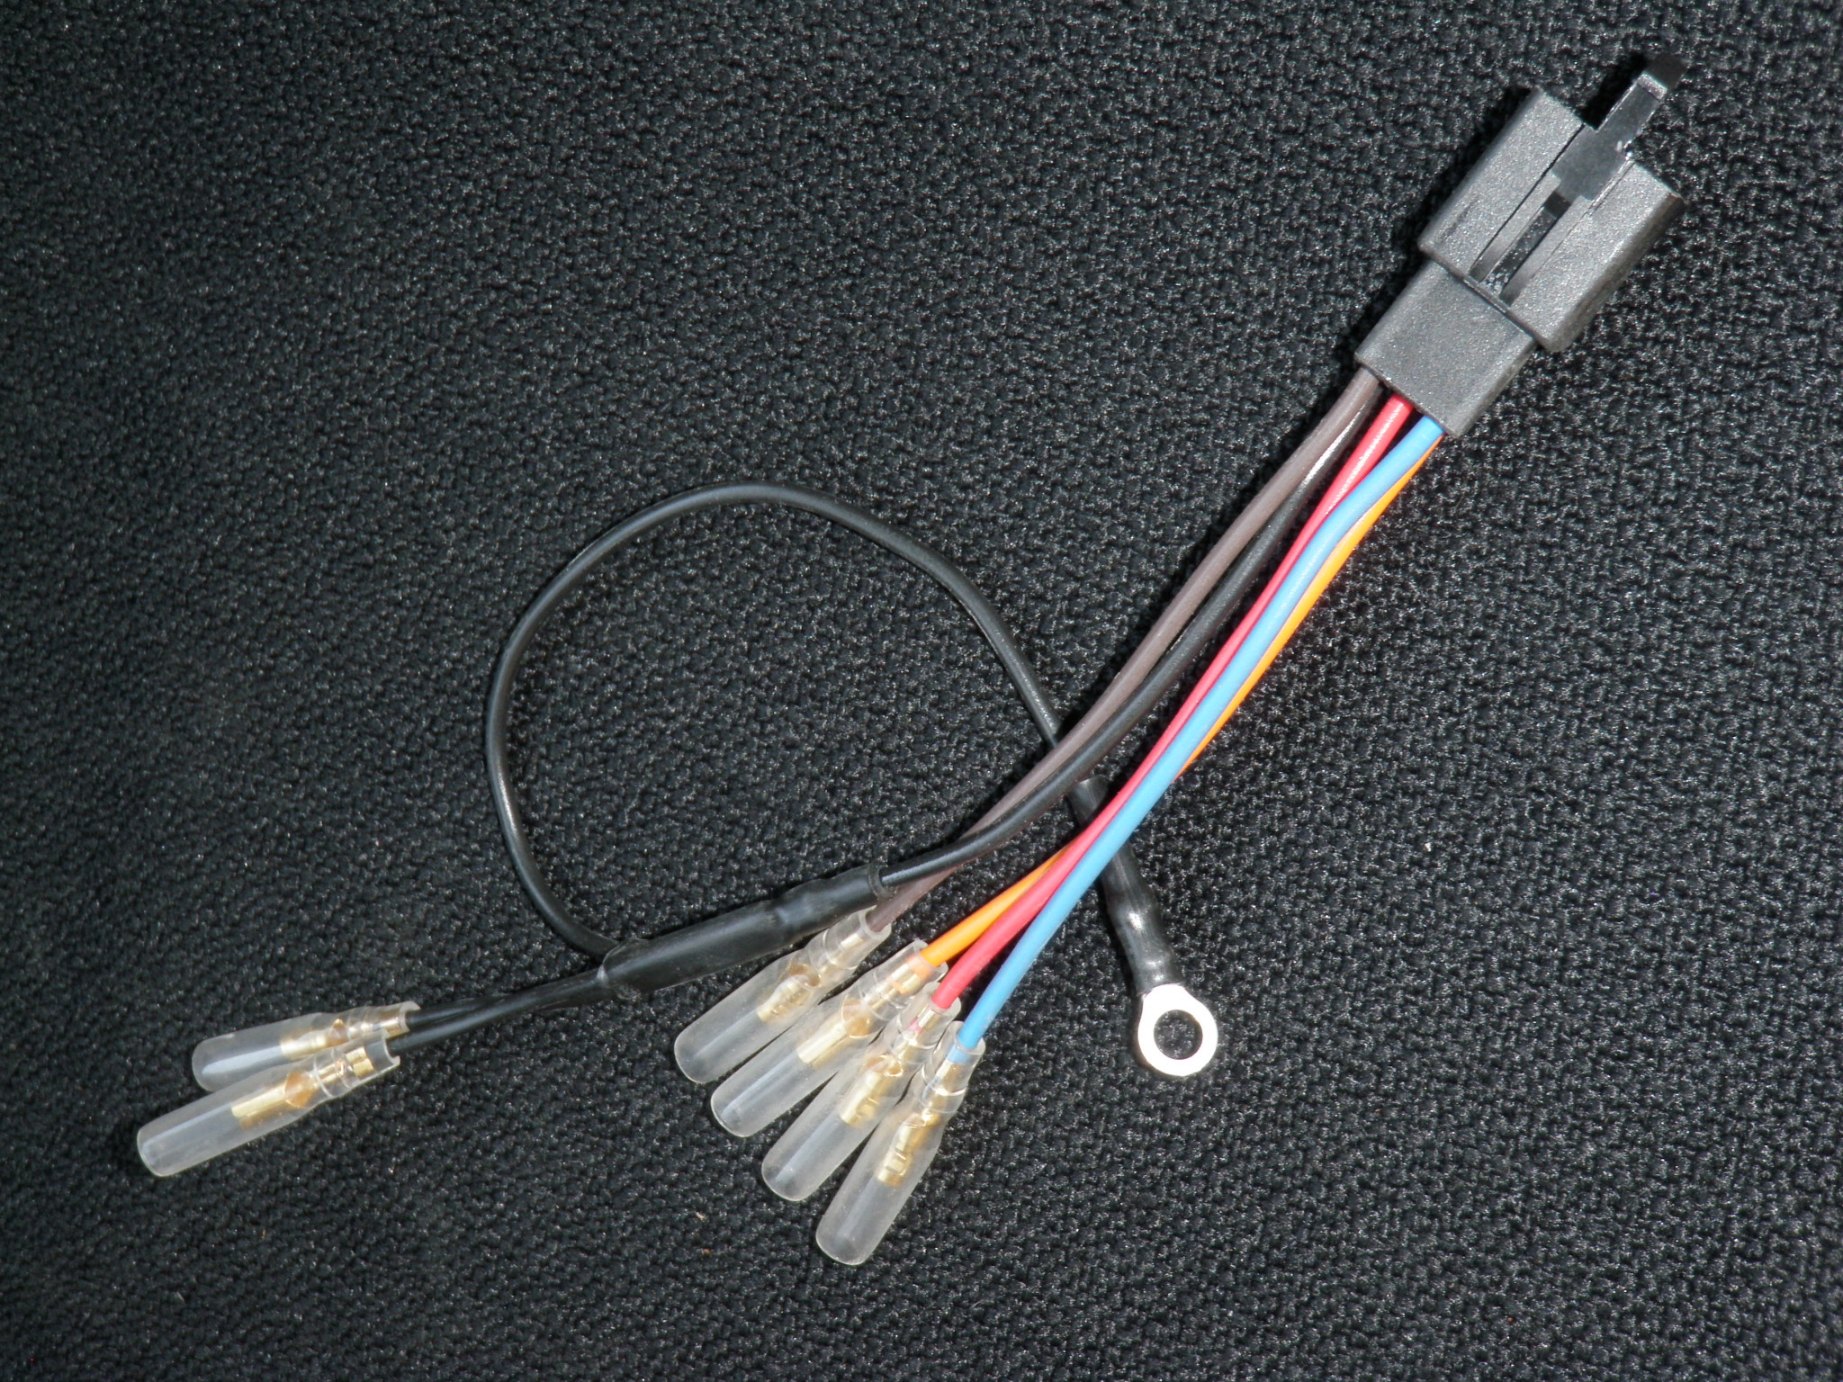
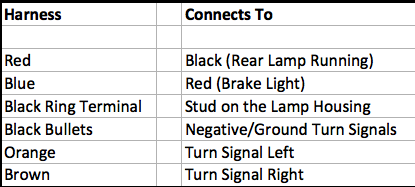
The quick connect harness that I ordered from Maund will plug right into the OEM assembly that the original rear light and turn signals were attached to. Once you have that, you’ll need to connect the colored wires from the harness to the appropriate wires on the taillight and turn signals. This seems to give a lot of people some trouble, so use the following as a guide:
Once you have all your connections in place, turn on the ignition and test out all the lights. Assuming everything works, use some electrical tape and secure all of your connections. I also wrapped all exposed wire with electrical tape as it keeps everything together and protected.
If you followed the above instructions, the seat should have plenty of clearance over the rear taillight when you put it back on. If it seems to be a tight fit and is pressing down on the taillight, be sure you’ve installed the mud pan correctly (see above).
Front Signal Install
Also had a bit of trouble with the installation of the front turn signals in regards to the electrical connection. You’ll find all of the wiring connections inside the headlight assembly, so you’ll need to pull off the front lens to get access to those connections.
Before you go to far, be warned you’ll need to splice and solder your connections unless you were smart enough to buy another quick connect (I wasn’t). I ended up leaving the stock front signals on for another week while I waited for another part that I had to order.
You also won’t find that part on the Maund site. Would have been nice to know that beforehand.
Anyway, easy enough to solve. You can find a quick connect for the front signals over at NewBonneville.com using this link. You’ll notice they also sell the quick connect from the rear light and signals and I know many people have gone this route. Keep in mind, the wiring connections I gave you above were for the Maund harness if you go this route.
Final Look
That’s about it really. It took me about an hour to do the whole thing, and this was my first go at doing anything major with the bike. While I’ve done some basic wiring in the past, I definitely wouldn’t consider myself an electrician.
Here’s what my Thruxton looks like after removing the rear fender. I definitely like the looks a lot better without the fender. Seems to give it a more sportier look by exposing the rear tire.


Would I recommend this Thruxton fender eliminator kit, absolutely yes. The quality of the components is top notch, and the install was pretty straight forward if you do your homework.
If you have any questions on the Maund FEK installation, leave a comment below, and I’ll be sure to get back with you.
What do I do with the ground wires of the indicators?
Your advice is great!
I can’t recall off the top of my head Oliver and the bikes in storage for the winter so I can’t check for you.
Have you tried posting or searching on the TriumphRAT forum? They have all the answers over there.
Awesome description. I also purchased the Maund fek with rear and front turning signals. Thanks to your suggestion I am getting the wire harness for the front. Thanks again for the detailed instructions.
Glad it helped Mario.
Great writeup. I installed one also and documented at http://bonniecafe.com/ . I like your “from below” photo much better. Nice job. I’m glad I found this website (thanks, Triumphrat.net)
Rudy
I can’t thank you enough for these instructions. I’m sure I would have figured it out eventually but this saved me a lot of time.
I also had trouble with the front turn signals. Didn’t know there was a harness available. The first signal was a major pain and I ended up cutting both ends of my wire poorly. The second was easier. I used mostly the original wiring from the bike and some butt slice connectors and tucked them into the turn signal body. Eventually I think I’ll have to go back and re-wire them more neatly and cleanly.
The only hiccup I had on the back was attaching the black ring terminal. I attached it to one of the bolts that fastens the tail light to the mounting bracket but only after I had already attached the turn signals and most of the other wires. It’s a very tight fit and I had a helluva time getting the nut back on. So order of assembly can be a big deal.
BTW, I have the exact same Thruxton, color and all!
Awesome. Glad it helped. Love the bike and color. I get so many compliments and questions on the bike when I’m out riding. Truly a unique bike.
Trying to do the install. Can’t see you pictures. Could you email them to me?
Thanks ahead
Sstoughton@me.com