Hosting WordPress on AWS is easier than you think. You can actually complete a full WordPress install using Amazon Web Services in under 10 minutes if you have some technical background. If you don’t, and the term AWS freaks you out, it may take you 15 minutes.
In any case, simply follow along with my hosting WordPress on AWS tutorial, and I’ll have you up and running in no time.
Why Hosting WordPress On AWS Is Right For You
Hosting WordPress on AWS isn’t for the faint of heart. This may not be the right solution for you if any of the following hold true:
- You have no idea what AWS (Amazon Web Services) is
- The thought of impacting your blog scares the hell out of you
- You have enough challenges navigating your hosting providers website
- You’re cheap
- You don’t want to deal with the headache of managing a server setup
Keep in mind, by hosting WordPress on AWS you’ve become your very own Web Hosting provider. You are the IT shop and technical support when something goes wrong.
So why is hosting WordPress on AWS a good idea? Well, there may be a number of cases where you would want to do this:
- You are sick and tired dealing with a Web Hosting provider
- You need guaranteed up-time for your WordPress site (you won’t find any better than AWS)
- The ability to easily scale for changing traffic patterns on your site is important
- You’re technical and like learning new things
- You need to spin up a new WordPress site for a short period of time (perhaps for SEO purposes)
It really comes down to your specific needs, and you’re the one that needs to determine if hosting WordPress on AWS is right for you.
AWS Terminology
Before we get into the actual tutorial, let’s cover some basic terminology that you’ll need to understand. We won’t cover everything about AWS, as that’s a whole other topic. But let’s look at the things you do need to understand about hosting WordPress on AWS.
Region
AWS has a number of Data Center’s throughout the world, that are known as regions. When you are hosting WordPress on AWS, you can specify what region you want to host your server.
Availability Zone
Within each AWS Region are a number of Availability Zone’s. Each of these zone’s are isolated from each other to provide you with some redundancy.
Here’s a good primer on the difference between Region’s and Availability Zone’s.
EC2
This is Amazon’s Elastic Cloud Computing. EC2 gives you the ability to spin up a virtual machine (VM) that your WordPress Blog will be hosted on. You get to pick how much CPU and memory reside on your server.
This is the same thing your Web Host provides when you are in a shared hosting environment
EC2 Instance
Every virtual server that you create in AWS is referenced as an EC2 Instance. If you create 5 virtual servers, running 5 WordPress Blog’s, you have 5 EC2 Instances running.
Amazon Machine Image (AMI)
These are pre-configured images that Amazon has created for you to load on your EC2 instance, and there are 100’s to choose from. If you are looking for a base Enterprise Linux image, they have that. If you want a pre-loaded WordPress image, they have that too.
Yep, we don’t even have to install WordPress, Amazon has taken care of that for us.
If you want some additional information on the WordPress install that Amazon has available, take a look at the Bitnami site.
Volume
Think of the computer you’re working on right now. It has a disk drive right? That drive might be a solid-state drive or a traditional hard disk, but trust me it’s there. That disk drive might have multiple partitions, and each of those partitions are known as a volume.
So the volume in AWS speak, is your disk drive.
Elastic Block Storage (EBS)
Amazon’s term for storage. You can create multiple volumes for your EC2 Instance, and those volumes are part of Elastic Block Storage.
Elastic IP
When you create an EC2 Instance, Amazon assigns an IP Address from a pool of IP Addresses that are available within each Availability Zone. If you happen to stop your EC2 Instance from running, when you restart that EC2 Instance, Amazon will assign it a new IP Address.
An Elastic IP Address is a permanent IP address that you can have assigned to your server. You can stop/start your EC2 Instance as much as you want, and always have the same IP Address assigned to your server.
Hosting WordPress On AWS Tutorial
Now that we have a basic understanding on why you may want to host WordPress on Amazon Web Services, let’s walk through the required steps.
If you would rather watch a video of this tutorial, you’re in luck, I just happened to create a hosting WordPress on AWS tutorial video:
To view the video directly on YouTube, you can find that here.
Step 1: Access The EC2 Management Console
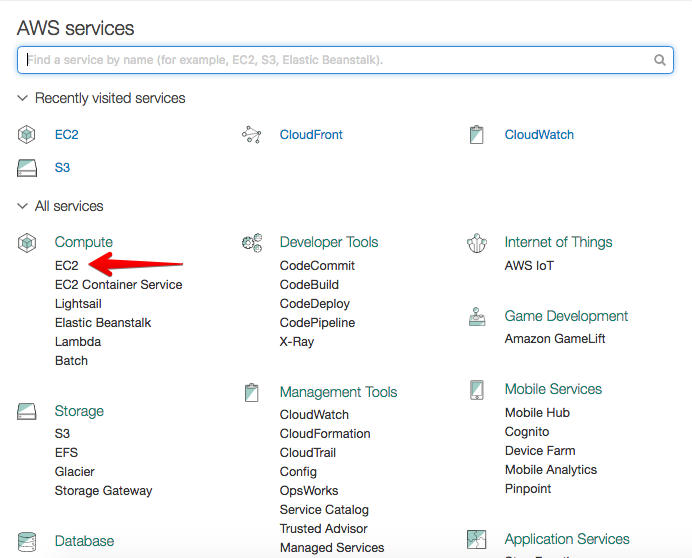
- Log into the AWS Management Console
- From the main AWS Services page, select EC2 under Compute
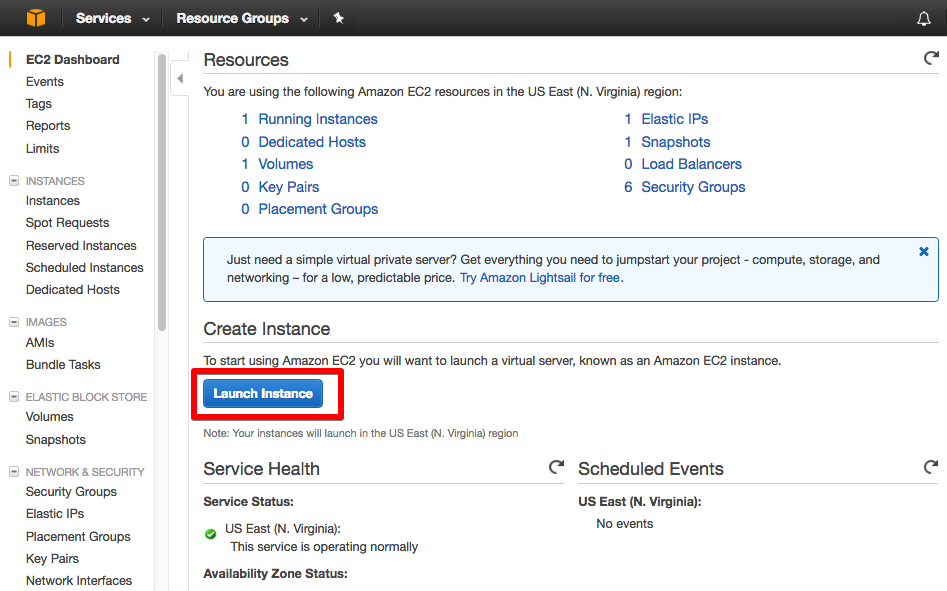
Step 2: Create An EC2 Instance
- From the EC2 Management Console select the Launch Instance button
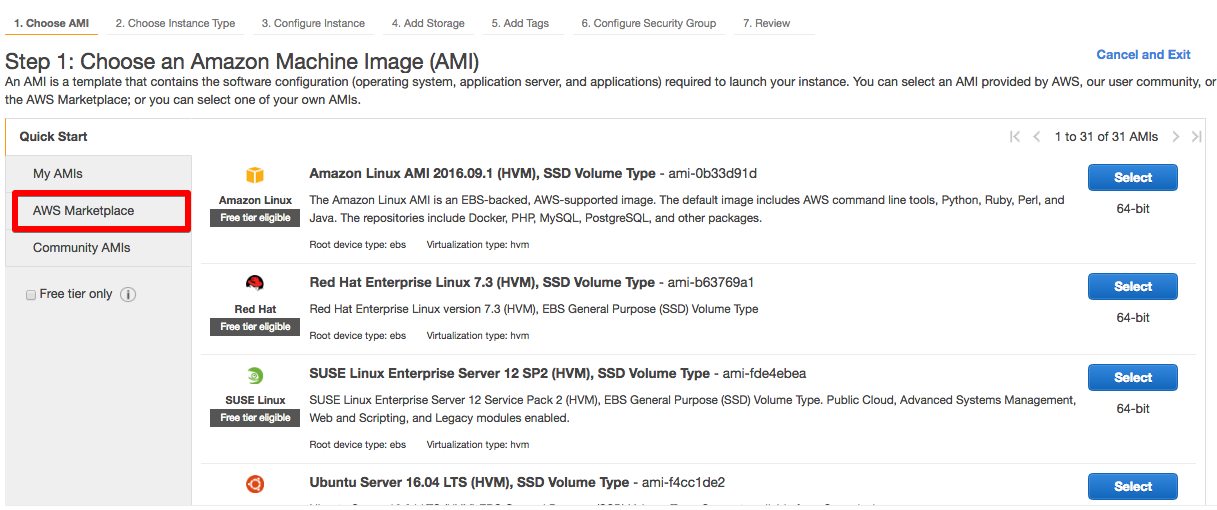
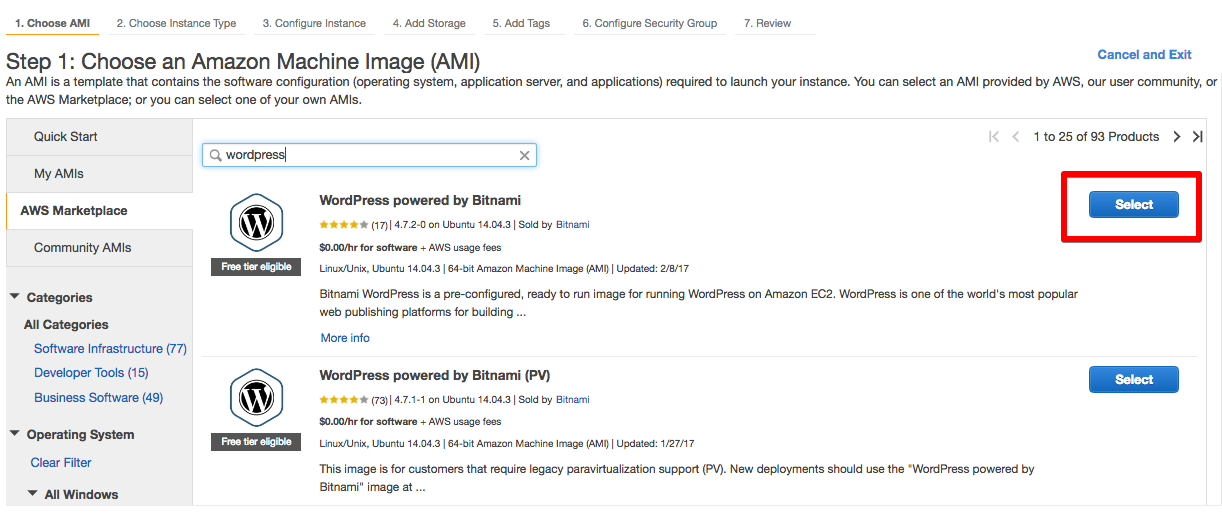
- Select AWS Marketplace from the left sidebar, and in the search bar on the next screen type in “wordpress” and press enter
- On the Choose an Instance Type Screen, you’ll want to select the size of the virtual server you want created. This all depends on your requirements. Just remember, the larger the server, the higher the cost
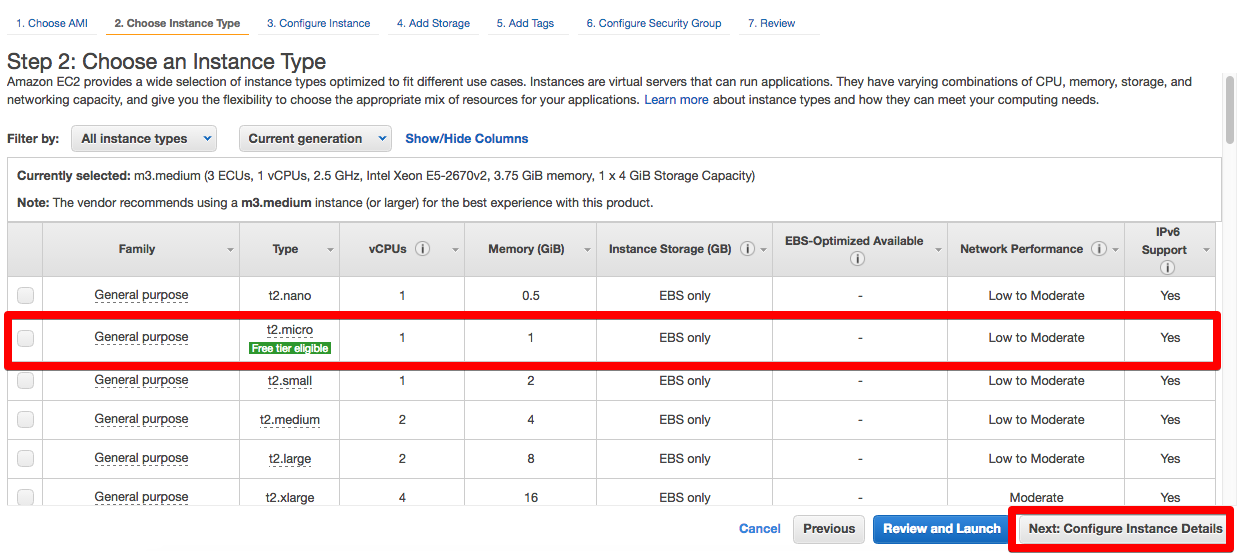
- Place a tick next to the server size you want to build, and press the Next: Configure Instance Details button
- On the Configure Instance Details screen, you can leave everything at the default settings, and click on Next: Add Storage
- From the Add Storage screen, you can leave everything at the default settings, and click on Next: Add Tags
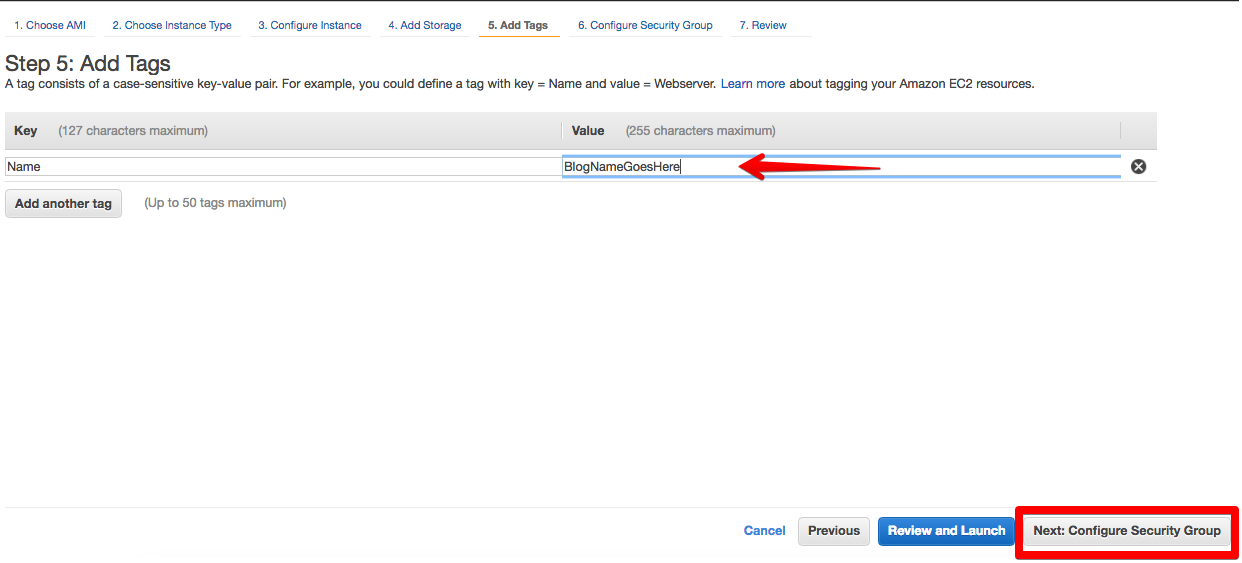
- On the Add Tags screen, you can name your EC2 Instance. This is a key / value pair, so leave the key field as “name” and specify the name of your blog for the value. It doesn’t really matter what you put here, it’s just an easy way for you to identify what your EC2 Instance is being used for. Click on Review and Launch
- Verify your settings and click on the Launch button
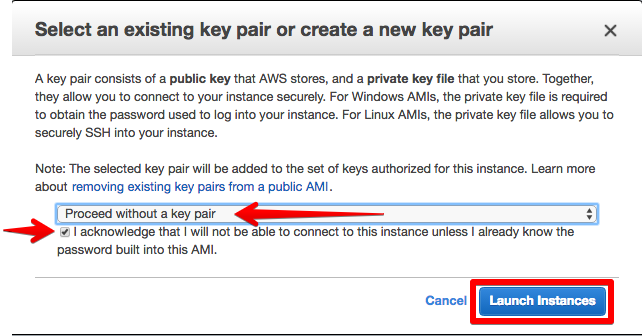
- An Existing Key Pair pop-up screen will be displayed. In the first drop down, select a “Proceed without a key pair”, tick the acknowledge box, and press the Launch Instances button.
It will take a few minutes for your EC2 Instance to be created. Once the screen is displayed, scroll down to the bottom and select View Instances.
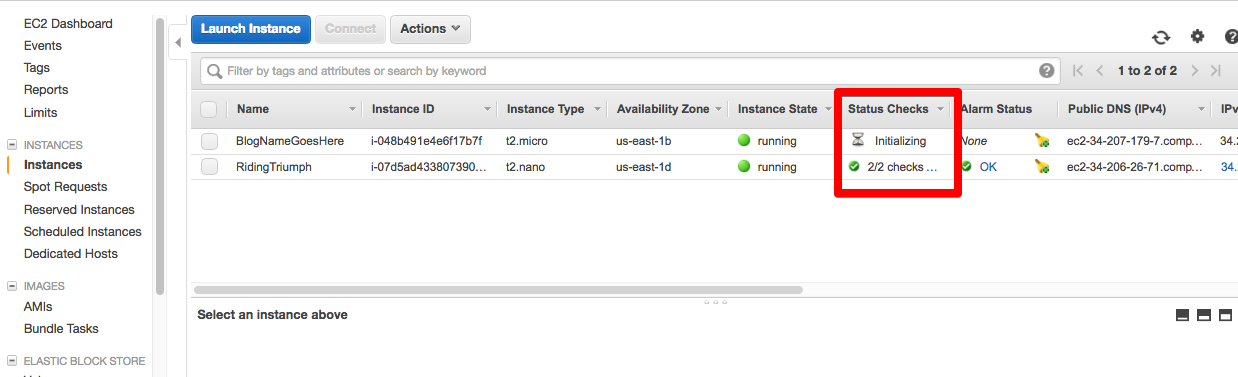
You should now see a screen where you can view a list of all your EC2 Instances. It will take a few minutes for Amazon to run through some status checks, and once completed you’ll see a green check mark in the Status Checks field.
Wow! There you go. You just spun up a virtual server in the cloud and it already has WordPress running on it.
Step 3: Accessing Your WordPress Blog
While we are now hosting WordPress on AWS, it’s not doing us much good if we don’t know how to access it. So let’s access the thing.
- Place a tick mark next to the EC2 Instance we just created. The detail settings for that EC2 Instance will be populated at the bottom of the screen.
- Note the Public IP Address specified
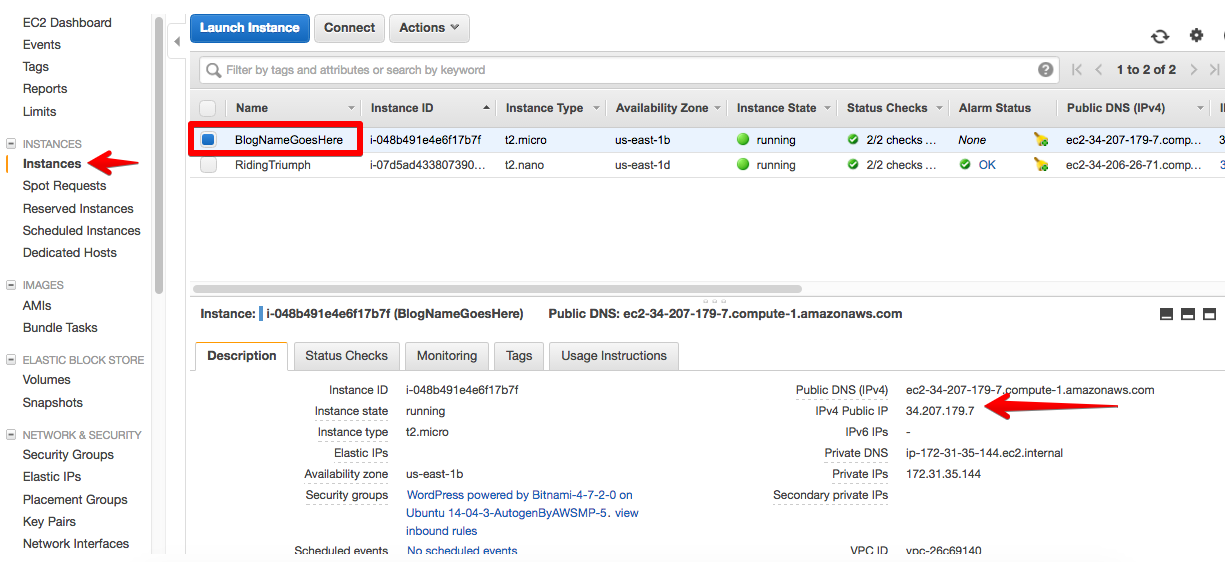
- Now head over to your favorite browser, and plug that IP Address into the URL.
- Congratulations, you just accessed your new WordPress site
Step 4: Signing Into Your WordPress Blog
Now that we know how to access your new WordPress site, what the hell is my User ID and Password so I can configure the thing?
- While still in the Instances list from the previous step, ensure you have a tick next to the EC2 Instance to select it
- Click on the Actions Button at the top of the screen, highlight Instance Settings, and from the sub-menu select Get System Log

- A pop-up screen will now be displayed that looks like a terminal screen with green text. Scroll down near the bottom of that text for some text surrounded in hash marks, where you’ll find the password for the WordPress Blog you just created.
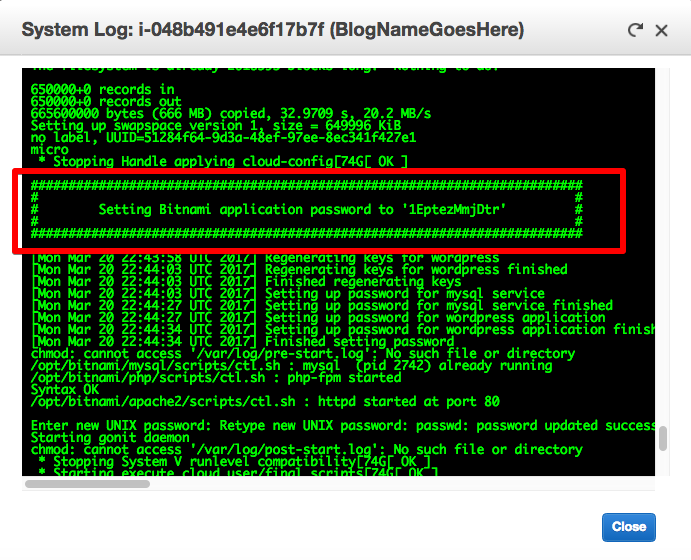
- Highlight and copy that password to your clipboard
- Head back to your browser that still has the IP Address you pasted in the URL, and append a “/wp-admin”. It should look something like: “xx.xxx.xxx.x/wp-admin”. Look familiar?
- Enter “user” for the User Name (it will always be “user” until you create a new User in WordPress)
- Paste the password from the green terminal screen and hit enter
You’re in. You just finished hosting WordPress on AWS.
Now go ahead and configure WordPress to your hearts desire. You can change the theme, add new plugins, and create new users. Everything you can do with a normal WordPress Blog, you can do with the WordPress blog we just hosted on AWS.
Step 5: Create An Elastic IP Address
Sure this is all great, but I kind of want my end user’s to access my site with a domain name and not some random numbers that nobody will remember.
Before we can do that, we first need to create a static IP Address that won’t change every time we stop or start our EC2 Instance. When you are hosting WordPress on AWS, Amazon calls this an Elastic IP Address.
- Still in the EC2 Management Console, select Elastic IP’s under the Network & Security Group, and click on the Allocate New Address button
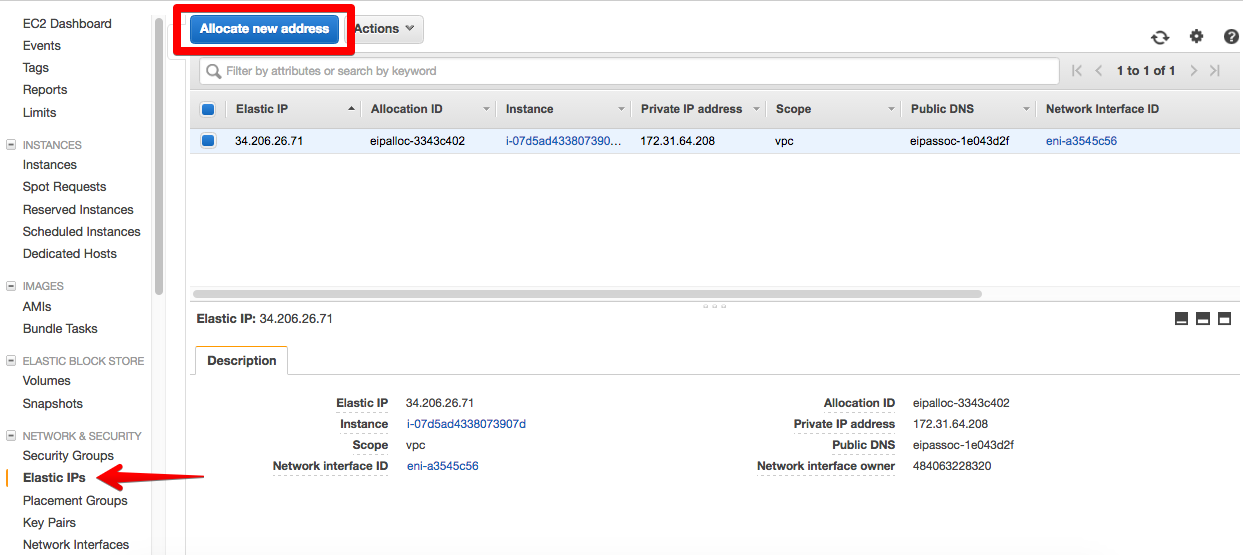
- From the Allocate New Address screen, click on the Allocate button

- You’ll see a screen that shows New Address Request succeeded along with your Elastic IP address. Click on the Close button
You will now be returned to the Elastic IP Address screen which will display all of your static IP Addresses.
Step 6: Assign Elastic IP Address To Your EC2 Instance
When hosting WordPress on AWS, you’ll need to assign that Elastic IP Address we just created to our EC2 Instance.
- Tick the box next to the new Elastic IP Address you just created.
- From the Actions menu at the top of the screen, select Actions than Associate Address
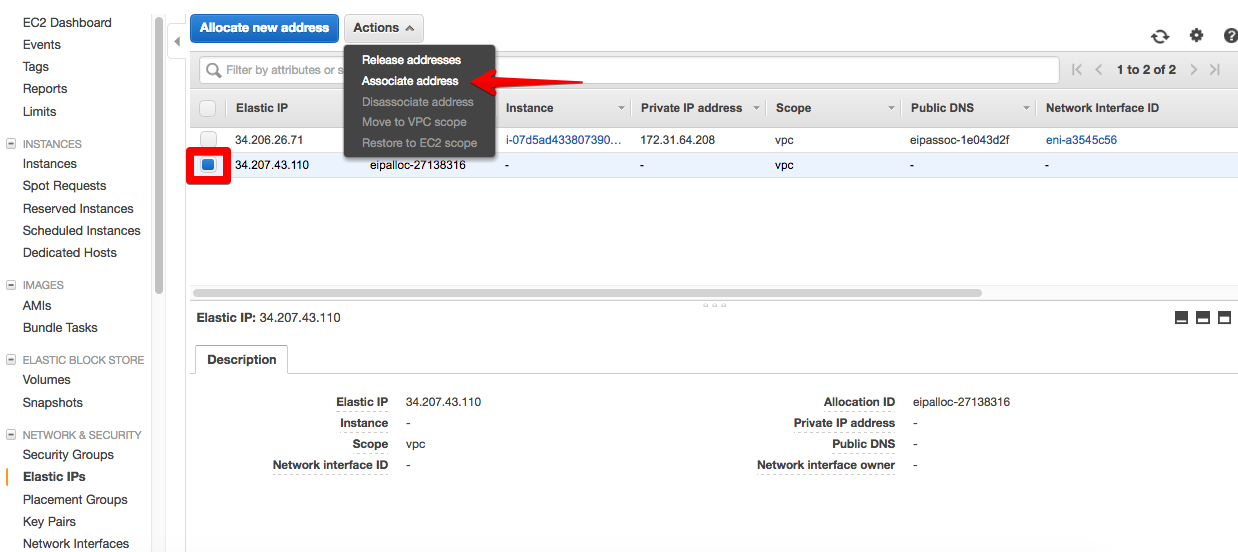
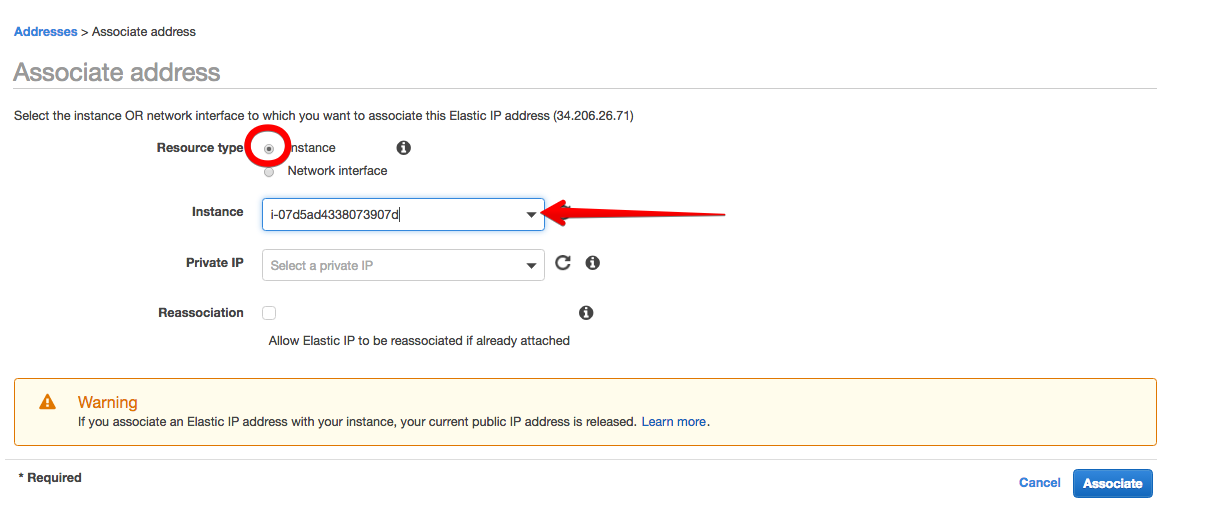
- On the Associate Address screen, select Instance as the Resource Type. From the Instance drop-down, select your EC2 Instance that you want to associate this IP Address to. Click on the Associate button.
- You’ll see a screen confirming you associated your Elastic IP Address to your EC2 Instance
One quick item to point out. Creating an Elastic IP Address and associating that with your EC2 Instance won’t cost you anything. However, if you do stop your EC2 Instance from running, Amazon will start to charge you for the Elastic IP Address. The reason being, you are using a static IP address that isn’t pointing to anything.
So be sure to disassociate the Elastic IP Address if you decide to stop or terminate your EC2 Instance for any reason.
Step 7: Point Your Domain To Your Elastic IP Address
Assuming you already have a domain name, you can now point that domain to your Elastic IP Address.
Depending upon where you registered the domain name, the process will be a little different to point that domain to the AWS hosted WordPress blog. The simple answer is, you will want to create a new “A Record” to point the domain to the Elastic IP Address we created in the previous step.
Refer to your domain provider for more information on how to do this.
Hosting WordPress On AWS In 7 Steps
Congratulations! In the prior 7 steps, we just completed hosting WordPress on AWS. Let’s do a quick review to see what we learned:
- We created a new EC2 Instance (a virtual server)
- WordPress was installed using AWS Marketplace and we learned how to sign into that WordPress site
- We create a new static, Elastic IP Address
- And we allocated that Elastic IP Address to your EC2 Instance
All in all, a pretty good tutorial about hosting WordPress on AWS if I must say so myself. Here’s a good post on some “gotchas” with migrating to AWS from a shared hosting environment that you should check out.
You can host WordPress on AWS using one click ready-to-run WordPress AMI (Amazon Machine Image). I would recommend to use Intuz WordPress AMI for the same. To launch this stack on Amazon EC2 you need to follow the steps mentioned here in this guide: https://cloud.intuz.com/applications/wordpress-stack/aws/how-to-use
Thanks for the information. Can you help educate me on what any advantage may be of running the Intuz AMI over the Bitnami AMI.
Hello Craig, thanks for reply and taking interest,
Here I am listing some benefits of Intuz WordPress AMI over Bitnami
1. 5 days free trail available
2. We have integrated SSL (Self Signed Certificate), phpmyadmin, webmin with file transfer and scripts for password, backup and update management.
For more details you can check: https://aws.amazon.com/marketplace/pp/B01N19GQJU/?ref_=_ptnr_intuz_ami_wordpress-stack#support
To Craig,
I was following your Youtube video’s for WordPress on AWS,and it was fine,all worked as seen on the video.I have tried second instance of wordpress,and even following the video instruction,I cannot access the wordpress admin,
Wrong password,or user name,is what pops up.I managed to access the dashboard,just once.Cannot do so now.
Would you have any suggestions ?
Thank You,
Hey Michael – I think you’re hosed. One of the first time’s I was playing around with this, I forgot to write down the password that was generated for my WordPress install. Based upon the research that I did, there’s no way to get this back. Simple answer is you’ll need to terminate your EC2 instance, generate another EC2 instance, and install WordPress again.
Hi,
Just wanted to ask: If we already have a running instance and want to apply yum updates (including new kernel), then do we need to stop the instance and restart httpd and mysql?
A snapshot can be taken prior to updates (from AWS console)
How to update without breaking a running instance?
Thanks
Yes. If you are patching a running instance, best practice is to stop that instance before applying any updates.
Excellent tutorial, Craig. Everything worked exactly as you explained. Thank you for sharing. What is your opinion on using a stack like Intuz? There are dozens of these on the AWS Marketplace. I got a bad feeling in my gut when I viewed the Intuz entry. Forget their 5 days Free Trial. This is just click-bait to their sales funnel. They are charging $0.01/hr. By my calculation, that’s a whopping $87.60/pa on top of any AWS fees. So, if I went on the AWS Free Tier and used the Intuz stack, I may as well have gone to a standard web hosting site like Go Daddy. Using the Bitnami stack is $0.00/pa. Although Bitnami doesn’t have some of the additional features which are mostly open-source anyway. Am I wrong?
Not familiar with the Intuz stack. WP is open source, so I’d have a hard time paying for that, unless they are throwing in lots of additional features.
Hi Criag,
Very nice tutorials. I am interested in developing a social media website possible in WordPress. I want to know your suggestion for a platform to use? Would you suggest AWS? I have 1 websites that I developed in WordPress and 2 websites via a cooker cut tool called Weebly. All 3 websites are hosted by Fatcow. I don’t think I want to use Fatcow for this social media website. I’m just not sure. Do you have a way of contacting you via email as well to discuss off-line? If you like you are welcome to reach out to me at Callawayngt@gmail.com which is my business email.
Thanks,