Update: Appreciate the feedback I’ve been receiving regarding some of my CDN content not loading. Finally had a chance to take a look, and the problem should be resolved. The problem appeared to be related to my cache settings in W3 Total Cache, and I simply needed to purge all my caches. If you experience any problems related to content not loading, or a message related to “too many redirects”, please let me know so I can take a further look
It’s amazing how many posts there are on setting up a WordPress CloudFront CDN with W3 Total Cache.
The problem is, every post you read has a different spin, and trying to make sense of it is enough to drive one crazy. To make matters worse, a number of these posts have it plain wrong. In other cases, these posts only give you partial information.

I’ve spent a recent weekend setting up a WordPress CloudFront CDN using W3 Total Cache for this site. Actually getting CloudFront to work with W3 Total Cache was the easy part. The majority of the weekend was spent tweaking performance issues that really had nothing to do with CloudFront itself.
With all the misinformation I’ve been reading, I thought the best thing to do was write a quick post. Given that, here’s my tutorial on setting up a WordPress CloudFront CDN using W3 Total Cache.
This post assumes you are using an Origin Pull distribution. If you want to set up your CloudFront CDN using an Origin Push, be sure to check out my post on that.
But wait, there’s more…
If you’re more of a visual person, be sure to check out a video tutorial on creating a WordPress CloudFront CDN using W3 Total Cache. It follows the information in this post.
Follow the link to view my WordPress with Amazon CloudFront and W3 Total Cache video directly on YouTube.
If you’re interested in learning more on the AWS platform (Amazon Web Services), you definitely don’t want to miss out on subscribing.
WordPress CloudFront CDN Setup
First things first, what the hell is a WordPress CloudFront CDN, and why would I want to set up my blog to use CloudFront? While I’m not going to go into this in great detail, a CDN is nothing more than a Content Delivery Network.
Think of it this way, if your WordPress site has a lot of images and static files (which it does), it takes a great deal of time serving up this content to every user across the globe. This is especially true if you are on a shared hosting service, which consists of a single server residing say somewhere in California.
What if you had a network of servers, spread across the globe, and each of these servers had your content on it. That way, someone in London could access your server in the UK, without having to traverse their way to California.
This is exactly what using CloudFront with WordPress can do for you. They have servers all over the world, and the content from your Web Host (the Origin Server) is distributed to all these other servers.
Now all you have to do is tell your site hosted on the WordPress platform to use Amazon CloudFront. Luckily the W3 Total Cache plugin, and chances are you are already using this, has the functionality to distribute your content to the CloudFront servers.
Do You Need Both Amazon S3 and CloudFront?
The first bit of confusion I had was whether or not I needed to us S3.
Amazon S3 is Simple Storage in the Cloud. Think of it like DropBox or Google Drive.
In order for CloudFront to work, it needs to know what files your site has. Amazon CloudFront will take those files and distribute them across their network. It needs an Origin Server, the server where all your files exist. You have two options to set up an Origin Server:
- Creating an Amazon S3 Storage Bucket
- Leveraging your existing Web Server
I was hell bent on setting my CDN to use Amazon S3 as the Origin Server. Why? I don’t know, I thought it would be cool seeing all my files in the Amazon AWS Management Console.
You don’t need to. The easiest solution is letting Amazon CloudFront use your existing Web Server as the Origin Server. That way you don’t need to push your files to S3, and worry about keeping they in synch.
You do however need to set up an S3 Bucket for things to work properly. Why? Well I’m not really sure, since the bucket you set up never seems to get populated. But I have tried to set up CloudFront without having an S3 Bucket, and things just don’t work.
Let’s get into the specifics of setting up a WordPress CloudFront CDN using W3 Total Cache.
Setting Up WordPress With CloudFront and W3 Total Cache
Most of the bad information I’ve seen has to do with the CloudFront CDN settings in W3 Total Cache. Setting up a WordPress CloudFront CDN is pretty easy. Getting your WordPress site to act as the Origin Server is the tricky part.
This post on setting up a WordPress CloudFront CDN using W3 Total Cache is broken into 2 sections.
- Setting up the WordPress CloudFront CDN using the AWS Management Console
- Leveraging the WordPress CloudFront CDN Distribution using W3 Total Cache
Creating An S3 Bucket
Before we starting setting up Users and CloudFront, let’s get our S3 Bucket set up.
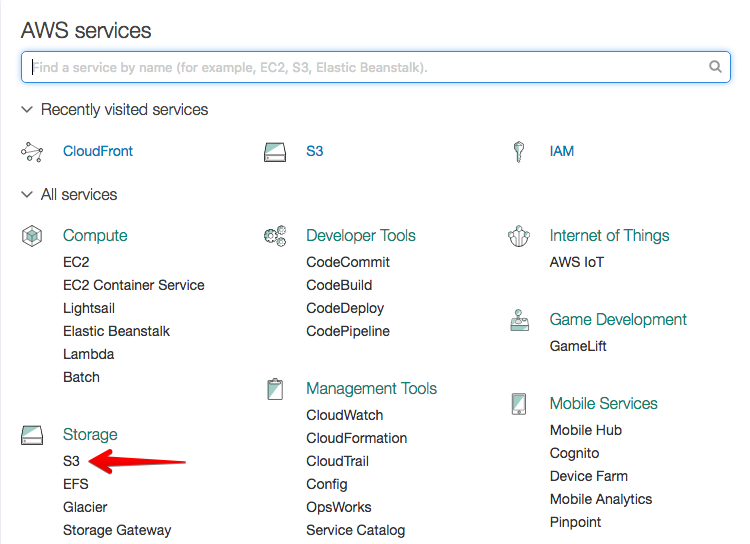
Step 1: Access Amazon’s AWS Management Console
Log into the AWS Management Console and click on S3.
Step 2: Create A New Bucket
A bucket is nothing more than a storage mechanism. The thing to keep in mind that your bucket name needs to be unique. And when I say unique, I’m talking across the whole of Amazon. So in order for things to work, you’ll want to name your bucket after your website. In my case, it’s called:
www.craigerson.com
- From the current screen, click on Create Bucket
- Name your bucket (your website domain name)
- Under Region select US Standard
- Click the Create Button
You’re S3 Bucket is now created.
Amazon CloudFront CDN With WordPress
Once we have our S3 Bucket created, our next step is to set up a User Group and User. W3 Total Cache will take care of everything else.
Step 1: Access Amazon’s AWS Management Console
If you’re still on the S3 screen, click on the Orange Box in the upper left hand corner. That will take you back to the main menu.
Click on Identity & Access Management.

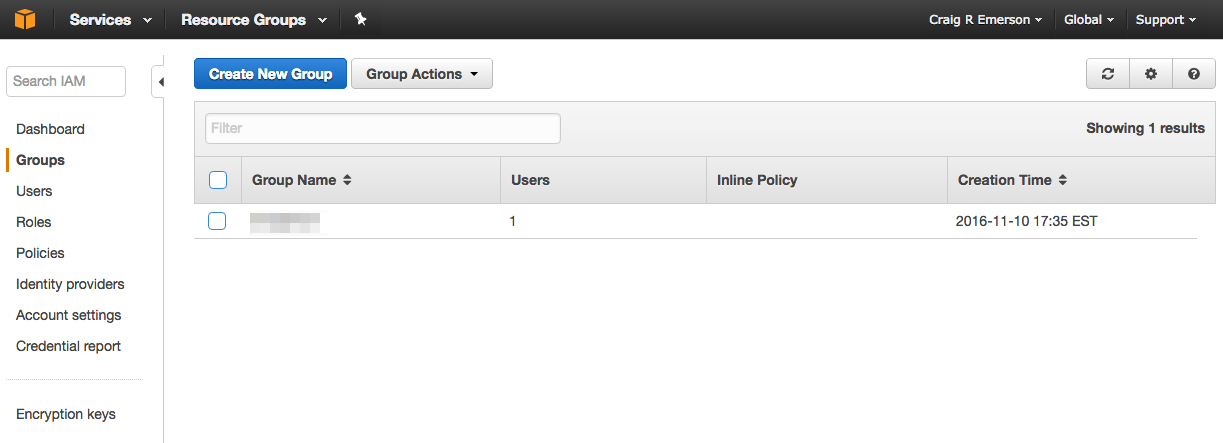
Step 2: Set Up A New User Group
The Identify & Access Management console gives you a lot of flexibility if you have a small or larger business. You can create multiple groups and each group can have multiple users associated with it.
Think of it this way. Every person in your company could have a user id associated with Amazon’s AWS Management Console. Depending on who this person is, they may have different rights in what they can perform within Amazon (Groups). This is the flexibility that Identify & Access Management gives you.
For a simple blog, we’ll have one group with one user defined in that group. First thing is to set up a new User Group
From the Identity & Access Management console, create a New Group.
- Select Groups in the left sidebar.
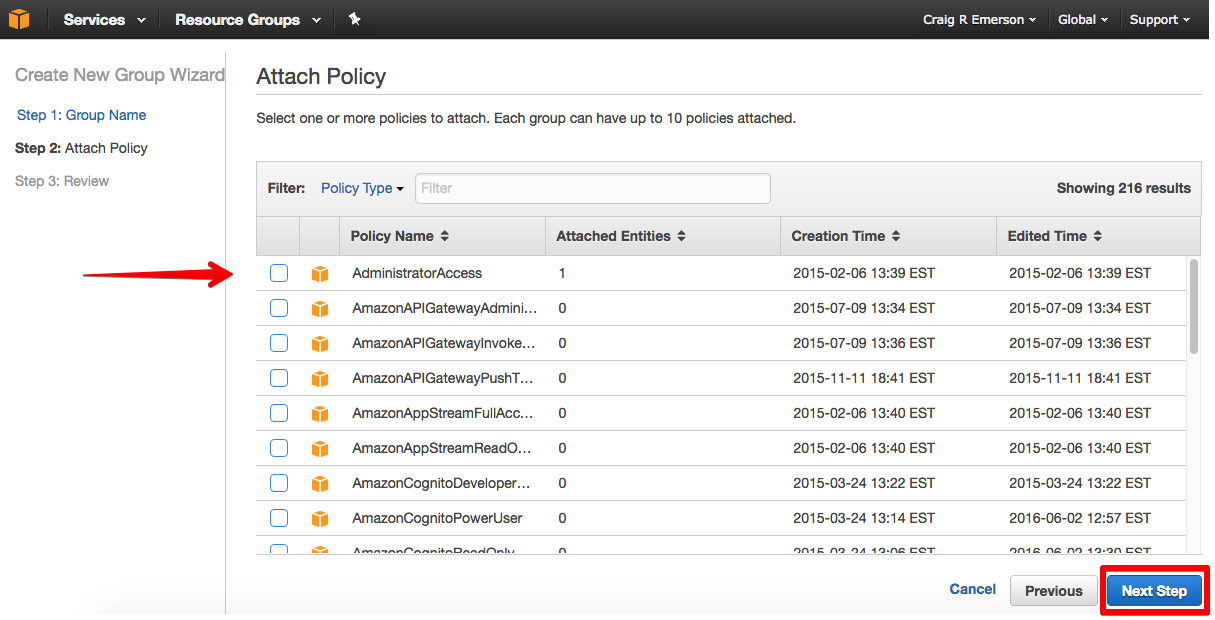
- Select Create New Group Button at the top of the page
- Give your Group a name (it can be anything)
- Click Next Step Button at the bottom of the screen
- Apply the Administrator Access Policy, and click Next Step
- Finally click on the Create Group Button
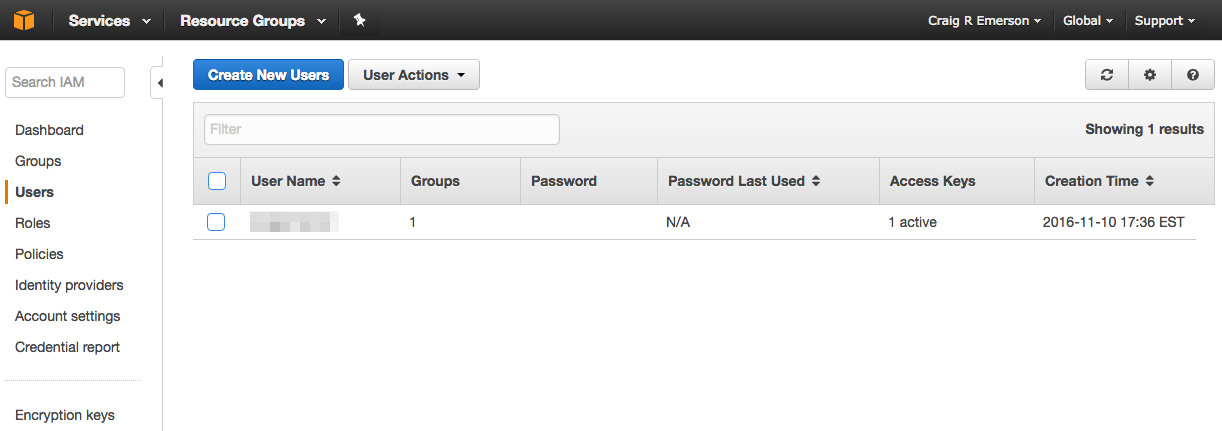
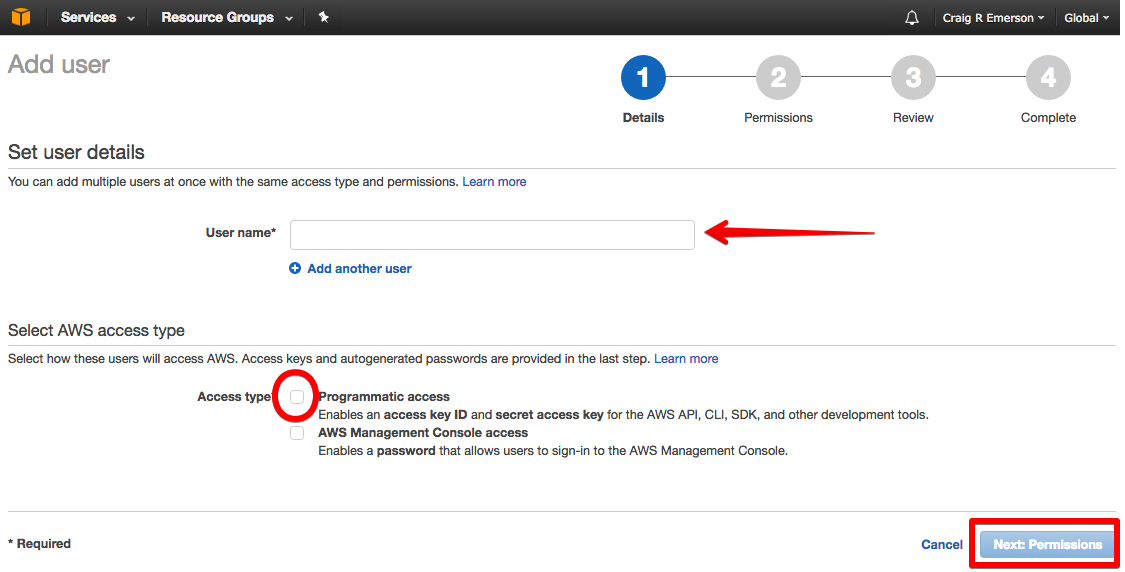
Step 3: Set Up A New User
Now that we have a User Group, we need to create an individual User ID that we can assign to that group.
Again, from the Identity & Access Management console, we now need to set up a New User.
- Select User in the left sidebar.
- Select Create New User Button at the top of the page
- Enter a User Name (it can be anything), and be sure “Programmatic Access” is ticked
- Click the Next Permissions button at the bottom of the screen
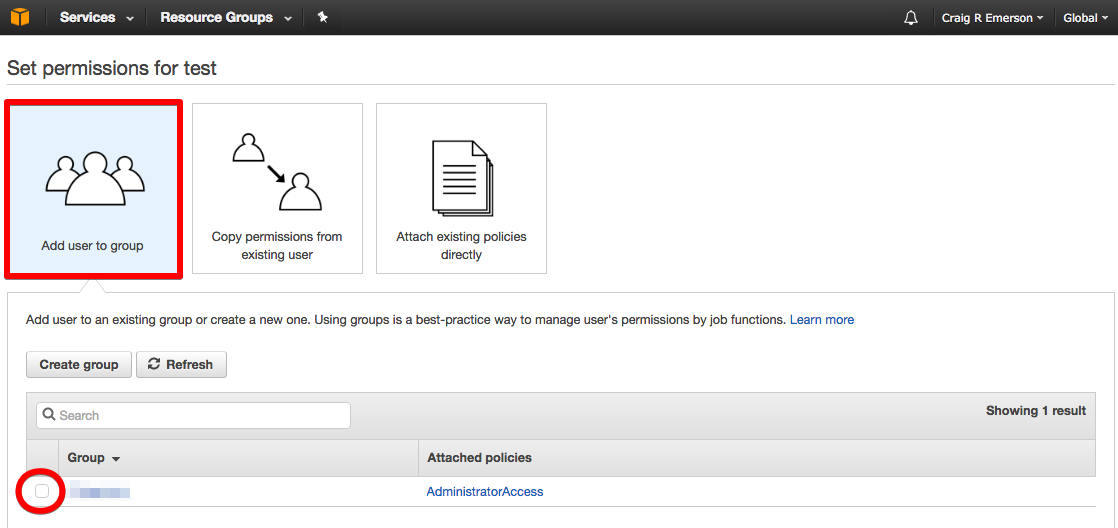
- From the next page, click on the Add User To Group box.
- Tick the box for the group you want to give the user access to and click the Next Button at the bottom of the screen
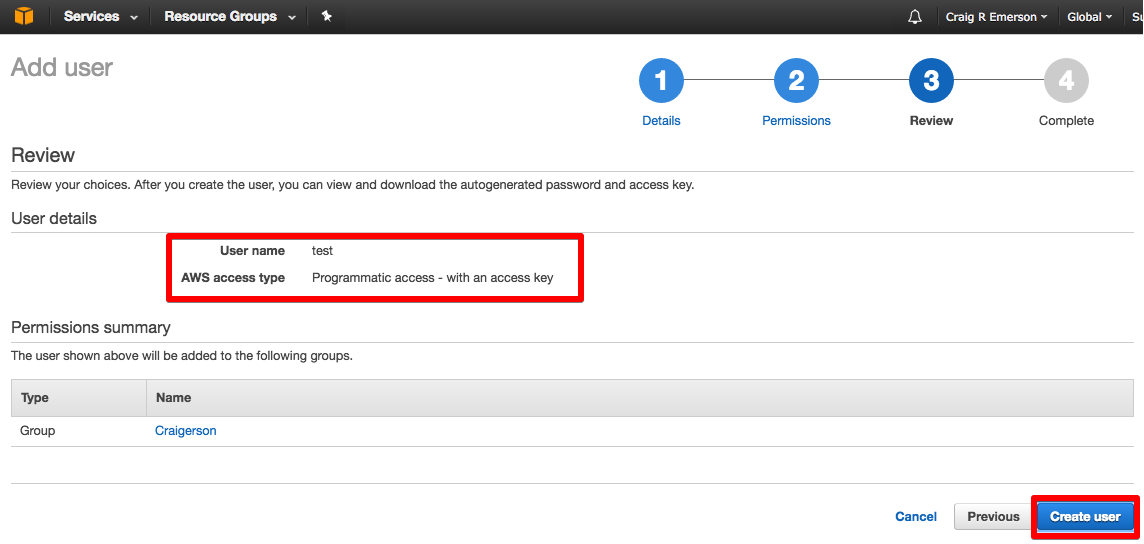
- Verify the User and Permissions you just set up, and click Create User
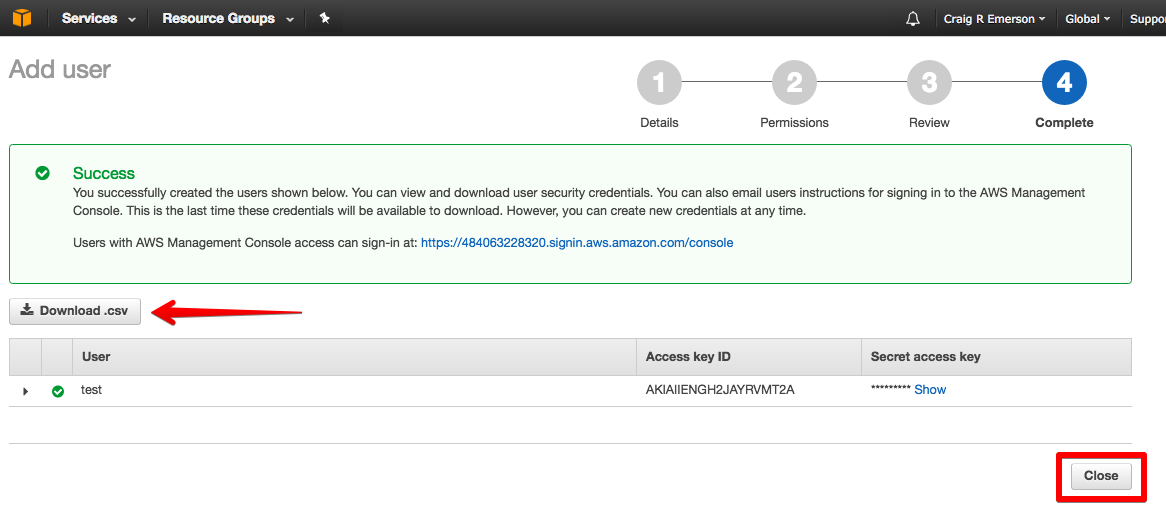
- The new User was just set up, but there is one more very important step. Be sure to press the Download .CSV button to download your new security credentials. Store this file, as this will be your only opportunity to view or save those credentials.
Believe it or not, this is all you have to do in the AWS Management Console to set up WordPress with Amazon CloudFront and W3 Total Cache.
Although CloudFront isn’t quite created yet, we’ll do that in the W3 Total Cache Plugin.
Setting up your WordPress CloudFront CDN with W3 Total Cache
Now comes the fun part. Setting up the WordPress CloudFront distribution using W3 Total Cache
This post is not going to get into all the various settings of W3 Total Cache, there are plenty of other posts that will walk you though that. The focus will be on the CDN settings of W3 Total Cache.
Overview Of CDN Settings
This is where I’ve seen a lot of misinformation. A number of posts will have you set up your CDN configuration as a Generic Mirror. While that option will work, it actually creates additional effort for you in your setup. We want to keep this easy. Let W3 Total Cache handle the heavy lifting for us.
Another area that causes a lot of confusion is Origin Pull vs. Origin Push.
Origin Pull
CloudFront handles the pulling of information from your Origin Server as needed. Remember, that’s your Web Server. There’s no need to upload files. Simply create your post, add images, and publish.
That’s it. Next time a CloudFront distributed server needs to access your post or images, it will get them directly from your Web Server (the Origin Server).
Origin Push
The other option is for you to upload your files manually. So every time you create a new post with images, you have to manually send that information to the Cloud. While W3 Total Cache gives you the functionality to do this, it’s an extra step that’s not required.
Again, we want to keep this simple! The focus of this tutorial is setting up WordPress, CloudFront and W3 Total Cache using Origin Pull.
Step 1: Turn On CDN Functionality
From the W3 Total Cache Performance Menu of your WordPress dashboard, click on General Settings. Scroll down to the middle of the page for the CDN settings.
- Tick the box to enable CDN
- In the CDN Type Dropdown, you’ll want to select Amazon CloudFront under Origin Pull/Mirror
- Click the Save All Settings Button
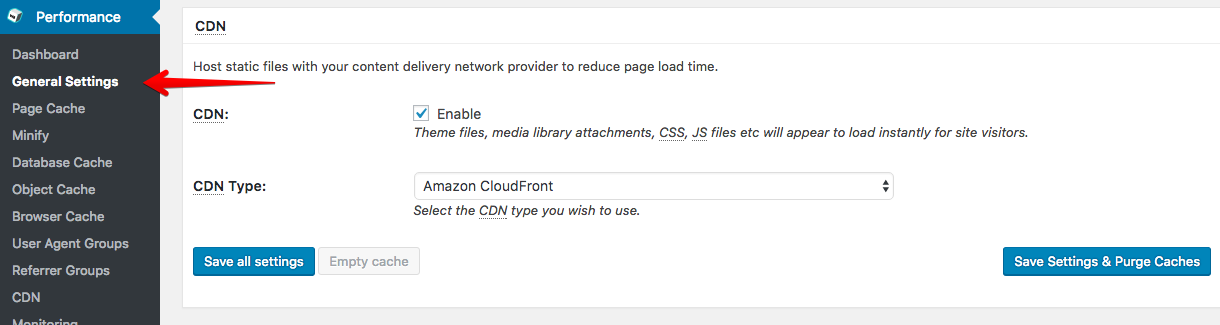
Once you hit Save Settings, you’ll receive an error that states:
“A configuration issue prevents CDN from working: The access key, secret key, and replace default hostname with fields cannot be empty”
You can ignore that for now, we’ll fix that in the next step.
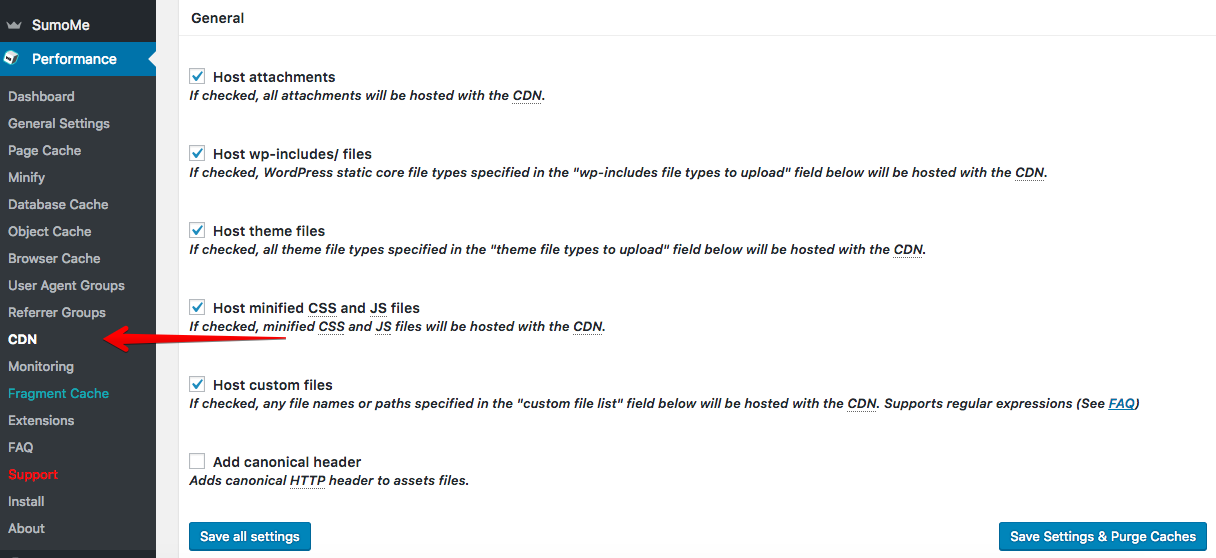
Step 2: Configure CDN Settings: General Section
Back to the W3 Total Cache Performance Menu, and select CDN.
In the General Settings section, be sure you have ticks next to all of the following:
Step 3: Configure CDN Settings: Configuration Section
Remember that file we downloaded when we created the User Name in the Identify & Access Management Console within Amazon? You’ll need that here.
- Copy the access key from that file and paste it in the Access Key ID field
- Copy the secret key from that file and past it in the Secret Key field
- The Origin Field will have defaulted to the URL of your site, which is exactly what we want. This is going to become the name of your Distribution in CloudFront
- Press the Create Distribution button next to that name

You just created your WordPress CloudFront CDN distribution. Don’t believe me?
Go back to the AWS Management Console, and click on the CloudFront option.
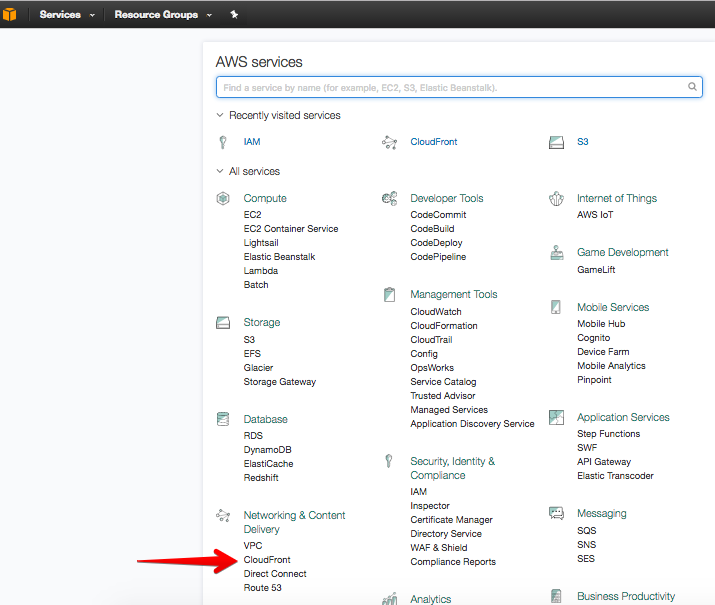
You’ll see your new WordPress CloudFront CDN distribution being created.
You’ll notice that it’s processing, so it’s not quite ready yet, it’s going to take a few minutes for CloudFront to scan you site and start pulling everything in. If you have a very large site, it could take a little longer. Don’t freak out if it doesn’t finish right away. It took about 10 minutes to scan this site.
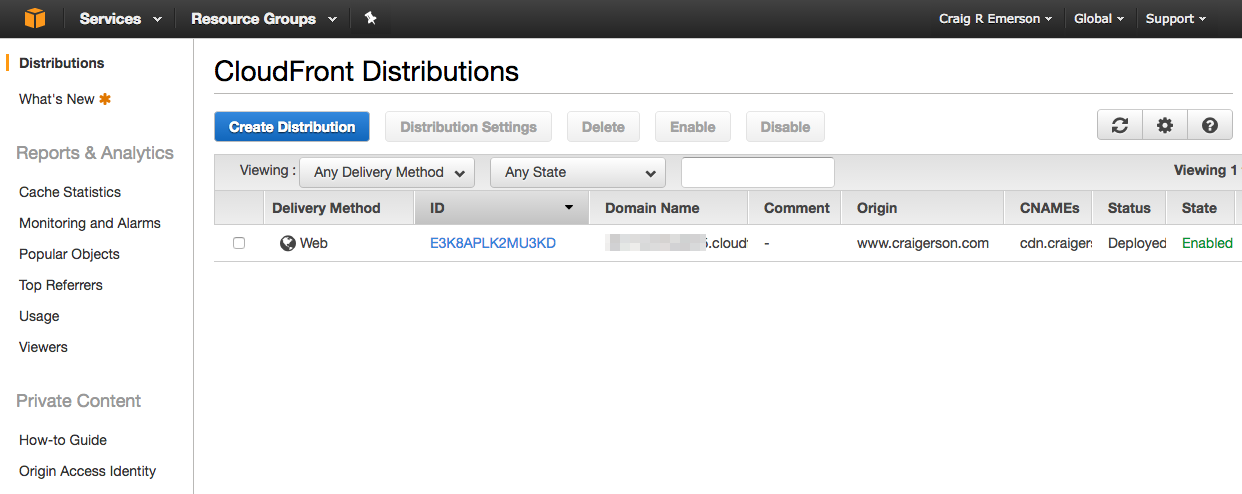
We’re not quite done yet, so let’s continue with our setup while CloudFront is scanning our site and building our distribution.
A Little About Host Name’s
Before we get into the next step, let’s talk a little about host name’s.
In the configuration section, you’ll see a field called “replace sites hostname with”. You should notice that the text box in front of cloudfront.net has been populated with some random characters.
That is the new URL of the distribution that’s being created. This is where your content will be accessed that gives you the benefit of a CDN. In most cases the name here doesn’t really matter. And it’s perfectly fine if you leave it as is.
The only time this name comes into play, is if someone clicks on an image in your post, and it opens in a new tab in your browser. If the user notices the web address, it will look something like this:
xdnbt72rcd.cloudfront.net/images/name.jpg instead of www.craigerson.com/images/name.jpg
Not a very user friendly name is it? I guess it could even cause some confusion to a visitor on your site. We can fix that with a few extra steps.
Step 3: Create A New CNAME
Remember this step is optional…
The first thing to do is visit your hosting providers CPANEL. Every hosting provider is a little different, so it’s difficult to give detailed instructions in this step, not knowing who your site is hosted with. A quick Google Search with something along the lines of the following should help:
“how do I create a CNAME in GoDaddy”
You’ll need to make a DNS change, so you’ll want to look for something called Domain Manager. Once you’ve located that, you want to find the option to create a new CNAME. This is nothing more than an alternate name (or alias) to a specific URL.
In this step we’ll want to create an alternate name to the URL that’s found in the hostname field of the configuration options. This is the name that looks like a bunch of random characters followed by cloudfront.net. You can call this alternate name anything you want, just make it something a little more user friendly.
In my case, I called mine cdn.craigerson.com.
Step 4: Configure CDN Settings: Configuring The Hostname
Once you’ve created that CNAME with your hosting provider, let’s go back to W3 Total Cache and continue with our setup.
We are still in the W3 Total Cache Performance Menu, and in the CDN options under Configuration.
Take the new CNAME that you created and plug it into the field directly below the hostname in the W3 Total Cache labeled 1.
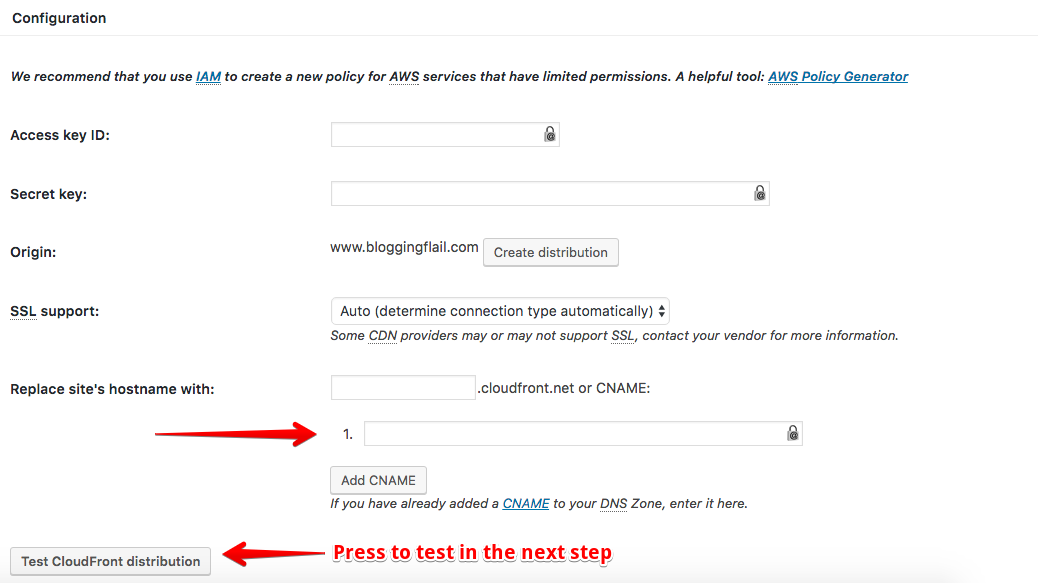
Step 5: Configure CDN Settings: Test The WordPress CloudFront CDN Distribution
Hopefully by now your distribution is all synched up in Amazon. Even if it’s not, we can still test things to make sure we’ve got everything configured properly.
Click the Test CloudFront Distribution button at the bottom of the configuration section of W3 Total Cache. If you see a message in green, congratulations, you’re almost there.
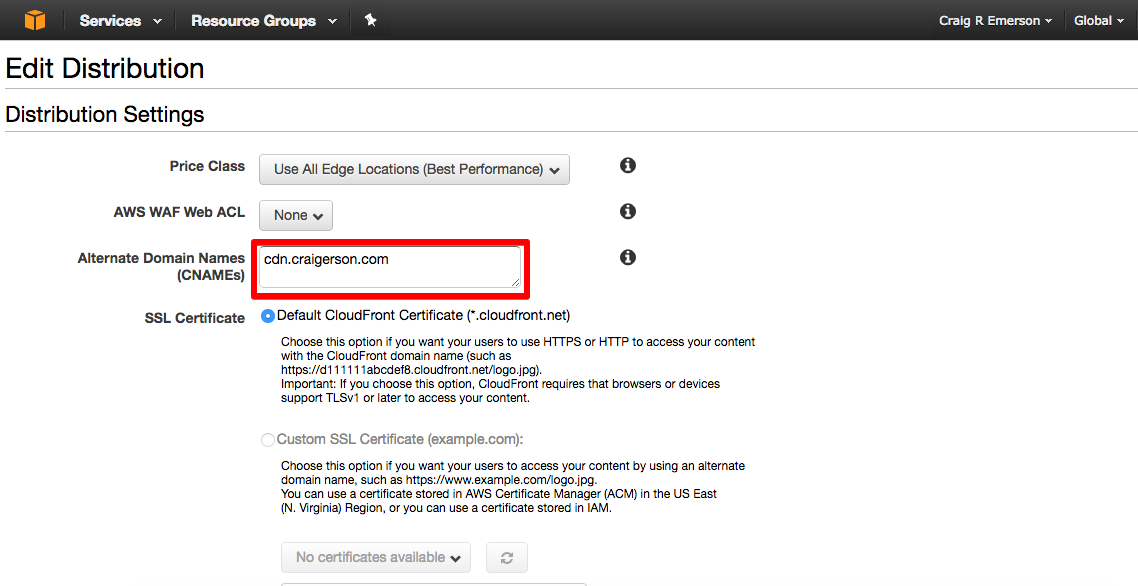
Step 6: Adding The CNAME To CloudFront
One last step, and that’s to let your new CloudFront distribution know about your CNAME.
Let’s head back to the AWS Management Console. From the main menu, you’ll want to select CloudFront if you’re not already there.
Note: Be sure to wait until your CloudFront Distribution is in a Deployed Status with an Enabled State before proceeding with this step.
- Place a tick next to your distribution
- Click on Distribution Settings at the top of the page
- Click on the Edit Button found just underneath the General Tab
- In the box that’s labeled “Alternate Domain Names (CNAMEs)”, add your new CNAME
- Scroll down to the bottom of the screen, and press the Yes, Edit button.

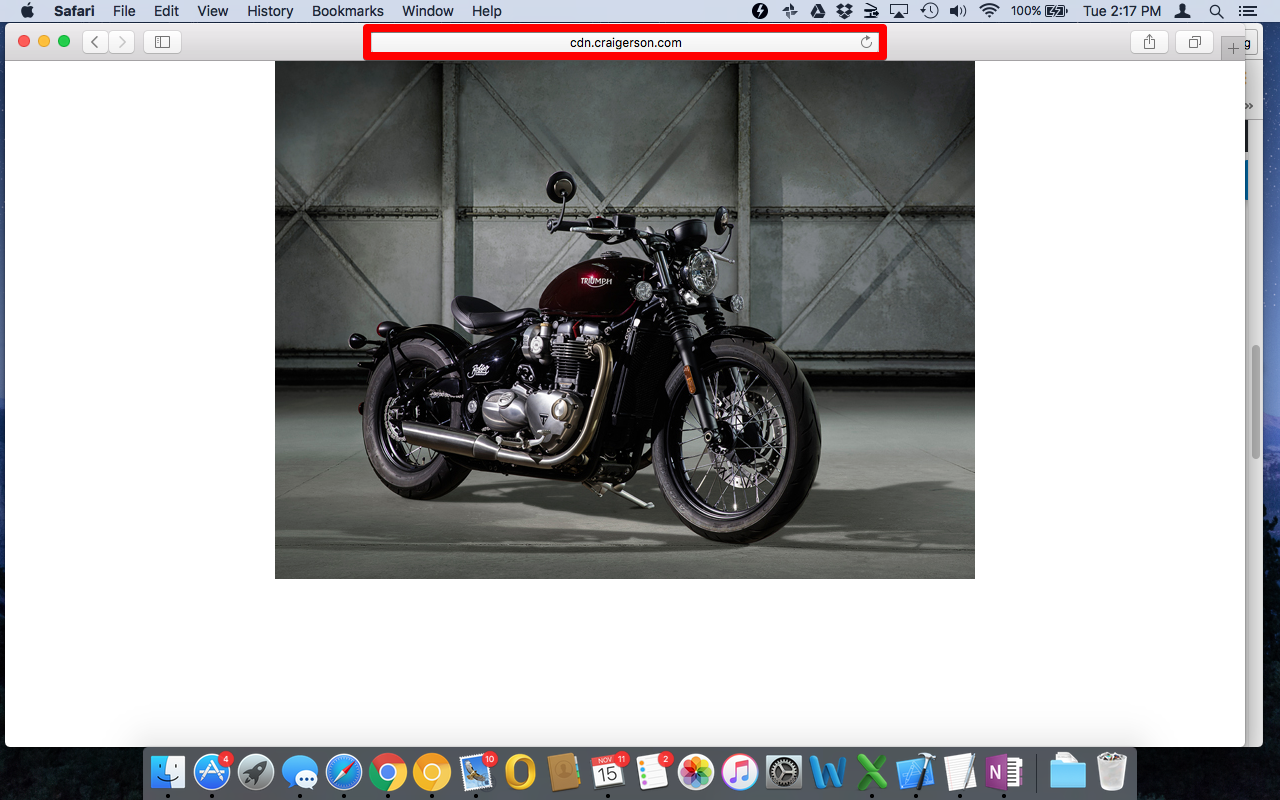
Testing The WordPress CloudFront CDN Distribution with your Site
You’re done. You just set up a WordPress CloudFront distribution with W3 Total Cache!
Go ahead and open a page on your site in your favorite browser. Hopefully, everything looks the same as it always did. Now refresh that page, and you should notice it’s just loaded a lot faster than normal.
Find an image in the post you just opened. Now click on that image so it opens in a new tab in your browser. Check out the URL that just opened. You should see one of two things:
- Either the new CNAME you added or the default host name that shows in the W3 Total Cache settings. If you see this, your CDN is working
- Your site’s URL. If you see www.yoursitename.com/image/… something’s not working. Go back through this post and see what you may have missed.
WordPress CloudFront CDN and W3 Total Cache Video
If you’re like me, and prefer visuals, I’ve created a video to help explain things even further. The video follows the steps outlined in this post, and will show you how easy it is setting up a WordPress CloudFront CDN using W3 Total Cache.
Scroll back to the top of this post to view the video on Setting up a WordPress CloudFront CDN using W3 Total Cache.
And… If you’re in the mood to host your very own WordPress site in the Cloud, be sure to check out my post on WordPress and AWS.
thank you so much , please provide the video for Configure CDN Settings: Configuring The Hostname and Adding The CNAME To CloudFront..
love you so much….
Thanks Sara. I’ll try to get a post/video up on that soon.
As soon as I setup this blog on CloudFront using S3 as the origin server, my friends immediately started telling me I was at risk of the duplicate content penalty Google imposes on sites that have nearly identical content. how to avoid it
pls clarify
When using a CDN such as CloudFront, you should be setting it up so it only serves the static files from the CDN (images, javascript, and CSS). The dynamic content, your actual posts are still being served up from your Origin Server from your hosting provider. If you are using W3 Total Cache, the settings will take care of this for you.
One other thing you can do is check the Add Canonical Header option in W3 Total Cache / CDN Settings, and this will add your site URL as the header to the attachment files in the CDN. This will tell the search engines the preferred URL, thereby preventing the duplicate content issue.
That was truely a well presented article and video i.e.. you didn’t waffle on and just stuck to the point. Over the past few weeks I have been in the process of learning how to introduce a cdn to my wordpress multisite and even though I am not quite there yet your video was just what I needed. Love your style keep up the good work. Cheers
Wow! Thanks for the feedback Patrick, it’s appreciated.
Is it useful to add 4 CNAME
like
CDN.yourdomain.com
CDN02.yourdomain.com
CDN03.yourdomain.com
CDN04.yourdomain.com
all same location
Well the simple answer is that depends on how you are planning to use it. For a simple blog using WordPress, there’s probably not much of an advantage. However, if you have a lot of different things going on such as images, streaming video, etc., all on the same page I could see where this would be helpful. You could have one subdomain serving up the image content, while another streams the video.
Hello
I’m currently working on WP Multisite environment where I have five subdomains mapped to 5 different TLDs, and three subdomains mapped to 3 subdomains of the TLDs mentioned above.
What happens is that images on TLDs other than primary domain also fetch images from cdn.primary.com AND NOT cdn.TLD1.com
Is it possible to implement cdn.primary.com for the main website and cdn.tld1.com for TLD1, cdn.TLD2.com TLD2 and so on for several TLDs using the same or different CloudFront Distribution?
Thanks
Hi Craig! thank you for this detailed instruction. Actually, I read a couple of articles, but yours is the most concise and detailed.
In the meantime, I would really appreciate that if you could answer my question. I did all the steps up to Step 3: Create A New CNAME. The question is how I can check if everything works fine? I tried to open an image in a new window to follow its link, but I see that the link is not from the cloudfront. Does it me I did something wrong?
Thank you Hanna. If you did everything up until Step 3 it should work. I’ve done this multiple times on multiple blogs and it works every time.
Are you sure the distribution was fully created in AWS? Also be sure you purge all your caches in W3 Total Cache. Have a look at the video I created if you haven’t done that, as it sounds like you may have missed a step.
I repeated all the steps again and it works! thanks! waiting for another video how to Configure CDN Settings: Configuring The Hostname and Adding The CNAME To CloudFront
Craig, if I use Cloudflare services, does it mean I should create a new CNAME there?
I’m sorry Hanna, I don’t know a lot about CloudFlare and have never used it.
Thank God! Finally, someone explained the correct way to set this up and in step-by-step detail. Thank you! 🙂
Thanks so much for your step by step article. I could not for the life if me find out why W3 and Cloudfront was not working for me. Reading your article helped me realize that I had accidentally selected Push instead of Pull in the Cloudfront settings. Boy, Pull is a lot easier!
Hey Craig,
What can we do if we want to save/store all images content to S3 and serve it via Amazon CDN?
You’ll need to setup an Origin Push distribution instead of an Origin Pull. See my other post on setting up an Origin Push with CloudFront.
“So in order for things to work, you’ll want to name your bucket after your website. In my case, it’s called:
http://www.craigerson.com”
This line should be in bold.all caps and underlined. Cause ANY other bucket name existing or new will NOT work. I spent the whole day till this fact struck home. Might save someone else pain.
Sorry for your pain! I’ll have to update this to call it out more. Thanks for the feedback!
Craig,
First, very helpful post. I have been toying around and reading a lot on CDNs and the Amazon CloudFront always seemed to be the best to use.
However one issue I have is with CORS. This is one of the errors that I see:
Access to Font at ‘http://d2ka8aeuq492az.cloudfront.net/wp-content/uploads/smile_fonts/ronneby/icomoon.ttf?t0y29j’ from origin ‘http://www.blueheliumconcepts.com’ has been blocked by CORS policy: No ‘Access-Control-Allow-Origin’ header is present on the requested resource. Origin ‘http://www.blueheliumconcepts.com’ is therefore not allowed access.
Any idea on the CORS permission with CDN?
same here how did you fix that?
Great Article – just 2 points:
– I’d advise on giving IAM admin access, just provide the s3 and cloudfront access details required for better security
– If you are using SSL on your site then make sure you add a cert inside the Distribution edit page else you’ll get an error
Many thanks for this great write up 🙂
Thanks for the feedback Steve.
thanks for posting this, great guide!
Hi Craig!
Thanks for the walk through (and video) as they are very clear. I repeated your steps multiple times but to no avail will the images show as being hosted on the CDN. I have done the appropriate configurations for SSL support and allowed the distribution time to propogate.
My website is: Haleyjeanphoto.com
If you simply view the logo in a new browser, you see: https://haleyjeanphoto.com/wp-content/uploads/2016/09/logo2.png
If you manually add cdn into the url (for my custom dns) it pulls the image from the cf distr. :
https://cdn.haleyjeanphoto.com/wp-content/uploads/2016/09/logo2.png
I am not sure why its not pulling from cloudfront for everything? I have purged caches multiple times.. redid all the steps multiple times (providing well enough time in between each step). And yes, I have ensured the CDN option is enabled.
Any advice would be great, thanks!
Also, to note: when I click the “test cloudfront distribution” button it says “test passed”
Seems like it may have something to do with SSL I have not had the chance to deal with this yet. Sorry Matthew, hopefully someone else stopping by can provide some help.
Hi Craig!
Thanks for the great tutorial! One advice for all who use https: Make sure that in the Distribution Settings > Origins and Origin Groups > Origin Protocol Policy is set to “HTTPS only” and in Behaviours > Viewer Protocol Policy is also set to “HTTPS only” to make sure Cloud Front files are not served over HTTP.
John
Thanks for sharing John, much appreciated.
Hi Craig,
Amazing tutorial!
Really helpful, Thanks!
I have a question, is it possible to set 2 different websites on the same AWS cloudfront account?
If so can you please explain how?
Many thanks in advance!
Thanks
Eyal
Awesome tutorial Craig, but I have one question…
My page size (in mb) roughly doubled in GTMetrix after I setup the cdn. Any idea why that might be?
Thanks
Thanks Stephen. That is strange. What was the impact on the load time after migrating to CloudFront? Did it improve or get worse?
Craig,
Very nice to have such a detailed walk-through. Thank you!
I am still a little nervous about deploying the CDN. Answers to the following will help me get through it:
-If I go live with this and it “breaks’ something can I turn it off and have my server host the data instead?
-Do my links that I have out on other sites stop working? For example FB, Pinterest, etc. links directly to my site images at my hosts url. That url will change with CDN and links are broken. Am I correct?
Thanks again for taking the time to research and share this process!
-Bobby
You can easily turn it off within W3 Total Cache. Links will continue to work as your Origin Server (your Web Server) never changes, all content remains as it always has.
Fantastic article – I clearly have to go check out what all else you’ve written. You really simplified the S3 CDN thing… I tried it in the past, and kind of gave up on it. This was a breeze.
One downside though – I activated the CDN in W3 , and all my CSS broke – Any thoughts on how to fix that? Other than the fact my site looked horrible, my load times were through the roof, and my site scored much better on the various metrics sites. Now if I could enjoy those benefits AND the site looking as good as it does when CDN is off, I’m a happy camper.
That’s strange. You can try excluding your CSS files from the CDN, so that they continue to load from the Origin (your Web Server). You can do that directly from W3 Total Cache.
Lovely article, thank you.
I followed all your steps and it is now enabled, however, when I do the image test it is still appearing as a WordPress file. I’m not sure why it’s not working when everything seems to be set up fine. I read other comments about the SSL cert but not sure what to do there.
Does anyone have any suggestions?
Great tutorial Craig. I read the post and watched the video as well.
However it seems I have a problem when I put the custom CNAME. So, following your guide I have no problem and everything works well. But if I put the custom cname my site will look like this https://i.imgur.com/Iod0yrX.png (yeah I tested with a fresh WP but I actually have a pic on that hello world post)
If I put the default hostname as xxxxxxxxx.cloudfront.net everything is good and cdn works perfectly.
I’m sure I did all the steps properly. W3 cache is setup properly, I purged cache from w3 and so on. My site is a https site hosted on a droplet from digitalocean
Is been several hours and it seems cdn.mysite.com dns propagated fully after first 5-10 min.
Any advice?
Thanks
Hey Chris – I’ve received some feedback that https sites are causing some strange problems. Unfortunately I haven’t played around with CloudFront on a secure site, so I’m probably not going to be much help. Take a look at some of the comments on the YouTube videos I posted, as I seem to recall a few folks mentioning https previously. If not, post a comment out there as well, as I’ve seen other folks jump in to provide their assistance. Sorry I can’t be more help right now.
I think I managed to find out what’s the problem and I will post here since probably lot of people are having/will have this problem.
I have a namecheap ssl certificate for my site. Basically with a regular ssl certificate (the 5 bucks one) you can secure domain.com and http://www.domain.com. If you want to secure subdomains you need to get a wildcard ssl (about $90). That’s why my site looks funny when I put custom subdomain for cdn. The good part is amazon offer free ssl. However I will stick with default ssl from namecheap and skip for the moment using a custom cdn.
Hi,
What is the sue of creating S3 Bucket. I haven’t seen any file store in it. They why we have created the s3 Bucket.
Great question Vicky. Apparently something is taking place in the background, as I couldn’t get it to work without creating an S3 Bucket.
I’d like to know the answer to that one too.
Very nice! Craig. Followed the tutorial, i am able to put my wordpress on cloudfront. I would like to ask a question. Do you know how can I access the cloudfront headers (cloudfron-county-view) in wordpress (functions.php)? I guess the caching in the cloudfront just mess up WC_geolocation in my wordpress. i learn that every time the viewer request cloudfront, it will add some headers including cloudfront-country-view. I suppose it also will forward to my origin server right? i spent few days to look for relative information online, but didn’t get any. Or i am just wrong understanding about the structure between cloudfront and wordpress. The cloudfront never has to send request to my origin server when a visit click my site.
I am unable to select Cloudfront and rackspace cloud files in the CDN selection drop down. I have previously setup cloudfront CDN on another website just fine, but this site is hosted in Korea. Any ideas? Is there a restriction of using AWS Cloudfront from Korea addresses?
Thanks, this is great 🙂
The only thing is that all the images on the page being loaded by the cdn are not working (oh the irony)… if I remove cdn. from the image urls then they work fine.. a little worrying all things considered 😉
I would agree. Have you checked the file types being cached by the CDN? Are you possibly excluding image files?
Hi Craig – great article, I appreciate you writing this up! However, right now (August 2018) a bunch of images you included in-line for this aren’t showing. Most of them seem to be on your CDN…
For example, http://cdn.craigerson.com/wp-content/uploads/2016/11/AWS-Management-Console-S3.png
When I try to open it in a separate tab, Chrome tells me “This page isn’t working
cdn.craigerson.com redirected you too many times.
Try clearing your cookies.
ERR_TOO_MANY_REDIRECTS”
Thanks for the heads up Jason. I’ll take a look.
A little difficult to have any confidence in this tutorial when your own images on your CDN don’t load
I know right. I’ve been getting some comments and emails over the last few months, and haven’t really had a chance to dig into the problem. I can tell you this was working without issue when I first rolled this out, but obviously it’s not all working now. I’ll get an update out once I figure out the problem.
Thank you so much for this article Craig. After going through several articles and messing up a few times, I finally have Cloudfront working for my business website. I have been trying to migrate from Stackpath, which is pretty good as well, especially their 24/7 customer support, but in the interest of wider reach and more data centres, decided to bit the bullet and get the AWS Cloudfront integration done although Amazon provides unusable documentation on setting it up for non-tech people.
Right after the implementation, I am seeing really slow load times vs Stackpath CDN. I hope it improves in a few hours, otherwise, I might have to roll back to Stackpath.
Thanks again!
You are welcome. I’m with you, I thought Amazon’s documentation was very poor. I don’t know anything about Stackpath, but I can tell you migrating to CloudFront had a huge improvement to my site load times. Hope this works out for you.
Hello Craig,
Great article! I can say that when I set up my Cloudfront pull, I did not have to set up an S3 bucket, but then again I was already using one for site backup. The one thing I do find disturbing of late is the number of invalidations generated recently..
We run an online store that has a very high product turnover. Consequently we are usually adding anywhere from 60-150 new items each week. Everytime I upload new images for these products, an invalidation is generated for each image and resized version created by WordPress.. To your knowledge, is this a function of the W3TC plugin or is it something that is done by AWS?
How does this integrate with Offload Media. I already use Cloudfront to serve images. According to my hosting, everything is served from my CDN but the problem is it isn’t being optimized. Will W3 Total Cash fix this? Is the set up the same?
“What I can recommend first is either reconfiguring your existing CDN to not load resources from a subdomain but from your main domain instead.”
Sorry about the delay in responding to this Sondra. How do you know the image isn’t being optimized? CloudFront will take the items you specify in W3 Total Cash (CSS, HTML, images, etc…) and copy those from your Web Server to the Amazon Edge Servers. So if you are using an image optimization plugin (Smush, EWWW Image Optimizer, etc..), those images are optimized before being uploaded to your Web Server, which in turn should be optimized when they are transferred to the AWS Servers.